Coffee Brewing Methods at Home: Drip, Pour-Over, Press & More
OneHundredCoffee is reader-supported, and some products displayed may earn us an affiliate commission. Details
There’s a funny moment that happens to almost every coffee lover. You buy better beans—maybe something freshly roasted, maybe something a friend swears by—and you expect the cup to magically taste like the café. Then you brew it at home, take a sip, and think… Wait. Why does this taste flatter? Or bitter? Or weirdly thin?
That’s the moment you realize the truth: coffee brewing method is not a small detail. It’s the whole stage your beans perform on.
I like to think of brewing methods the way I think of cooking. The same tomato can become a bright fresh salad, a slow-cooked sauce, or a smoky roasted topping—depending on heat, time, and technique. Coffee is the same. The same beans can taste chocolatey and round in one method, citrusy and crisp in another, and muddy or harsh if the method fights you.
So this is your “home brewer’s tour” through the major methods you listed—drip (filter, automatic, manual), cold-press, French press, vacuum pot (siphon), Turkish/ibrik, and percolator—with the kind of real-world details you actually need: how each method works, what it tastes like, why it goes wrong, and how to make it shine.
Best Tested & Reviewed Coffee Brewing Gear At a Glance
| Image | Product | Features | Price |
|---|---|---|---|
|
Best Automatic Drip

|
SCA-style fast brewing
|
Price on Amazon | |
|
Best Value Auto Drip

|
One-touch SCA brewer
|
Price on Amazon | |
|
Best Manual Drip

|
Clean, bright pour-over
|
Price on Amazon | |
|
Best Filter Drip Carafe
|
Beautiful, clean drip coffee
|
Price on Amazon | |
|
Best No-Fuss Manual

|
Fast, low-bitterness brew
|
Price on Amazon | |
|
Best Cold Press

|
Smooth concentrate maker
|
Price on Amazon | |
|
Best French Press

|
Classic immersion body
|
Price on Amazon | |
|
Best Vacuum Pot

|
Showpiece vacuum brewing
|
Price on Amazon | |
|
Best Turkish Starter

|
Hammered copper cezve
|
Price on Amazon | |
|
Best Percolator

|
Strong classic percolation
|
Price on Amazon |
The big idea: every brewing method is just water + coffee + time… but the path matters
Here’s the simplest “why methods taste different” explanation that actually holds up:
- Percolation methods (drip, pour-over): water flows through the coffee bed
- tends to give clarity and “separated” flavor notes
- Immersion methods (French press, cold brew, Turkish): coffee grounds sit in the water
- tends to give body, roundness, and a deeper mouthfeel
- Hybrid/pressure-and-vacuum methods (siphon, percolator): they use physics and movement to change extraction dynamics
- can be aromatic, intense, or surprisingly clean, depending on filtering
If you’ve ever wondered why one cup tastes like “bright fruit and honey” and another tastes like “dark cocoa and toast,” a lot of that is method + grind + water.
And yes—water matters. If your water tastes like chlorine, your coffee will taste like chlorine wearing a coffee costume. A simple water filter or good bottled water for brewing can upgrade your cup instantly.
Before we dive in: the home basics that make every method taste better
I’m going to give you the “unsexy” truth upfront, because it saves you months of frustration.
1) Freshness beats fancy gear
If you can do only one upgrade, do this: buy whole beans and grind fresh.
Even a simple hand grinder can change everything.
A dependable entry grinder for brewed coffee is the Baratza Encore. It’s not a luxury item—it’s more like the thing that stops your coffee from tasting randomly good one day and disappointing the next.
2) Ratios matter more than recipes
Most great coffee lives between:
- 1:15 to 1:17 coffee-to-water ratio for hot brewing
- 1:5 to 1:8 for cold brew concentrate, then diluted
If you don’t want to feel like you’re guessing every morning, a small scale is the secret weapon. Something like the Hario V60 Drip Scale makes your coffee repeatable.
3) Clean equipment makes a cleaner flavor
Old coffee oils taste like stale nuts and bitterness. If your brewer has that “old coffee smell,” it’s not a charming café vibe—it’s flavor sabotage.
4) “Right grind size” isn’t a single number
Grind size is a relationship between:
- method
- filter type
- brew time
- pouring style
- coffee roast level
So you don’t find the grind. You find your grind for that method and coffee.
The Filter Drip Coffee Brewing Methods
When people say “drip coffee,” they often mean “regular coffee.” But that’s like calling all bread “toast.” Filter drip is actually a family of methods built around one idea:
Hot water passes through coffee grounds held in a filter.
That filter is doing two major jobs:
- Keeping grounds out of your cup
- Controlling how much oil and fine sediment gets through (which changes the body and clarity)
What filter drip tends to taste like
When it’s dialed in, filter drip coffee is:
- cleaner than immersion methods
- balanced, often with a smooth sweetness
- clear enough to notice notes, but not as sharp as a precision pour-over
- satisfying for “daily drinking,” especially medium roasts
Why is the filter drip beloved for the home?
Because it’s the most “drinkable” method for most households. It scales well. You can brew 2 cups or 10. It’s forgiving. And it pairs beautifully with breakfast, work, and basically any moment where you want coffee to be comforting rather than demanding your full attention.
Where the filter drip goes wrong
Most bad drip coffee is one of these:
- brewed too weak (not enough coffee)
- brewed too hot or too long (bitter)
- unevenly extracted (watery and harsh at the same time)
- brewed with stale grounds
- brewed with bad water
That “watery but bitter” confusion is usually uneven extraction—some grounds under-extracted, some over-extracted.
Filter types and how they change taste
- Paper filters: clearer cup, less oil, brighter notes
- Metal filters: more oils and body, slightly heavier mouthfeel
- Cloth filters: often aromatic and silky, but require care
If you’re chasing “clean and bright,” paper is your friend. If you want “more body,” metal can be lovely.
The Automatic Drip Brewing Method

Automatic drip is the method that quietly runs most homes, offices, and hotel breakfasts. And here’s what surprises people: automatic drip can be excellent—not “good for drip,” but genuinely excellent—if the machine hits a few key requirements.
How an automatic drip works
A drip machine heats water and delivers it over grounds in a basket. Gravity pulls the water through the coffee bed and filters into a carafe.
The difference between a mediocre machine and a great one is usually:
- water temperature stability
- evenness of water distribution (showerhead design)
- brew time/contact time control
What “good” automatic drip tastes like
A good automatic drip gives you:
- consistent balance
- warm sweetness
- minimal bitterness
- a cup you can drink black without feeling punished
It’s the kind of coffee that makes you stop adding sugar because you suddenly notice the coffee has natural sweetness.
What to look for in a drip machine (real-world checklist)
If I’m shopping for a drip machine, I care about:
- Brew temperature: ideally around the SCA range (hot enough to extract properly)
- Even saturation: a good showerhead and consistent flow
- Brew time: neither too fast (sour) nor too slow (bitter)
- Thermal carafe: often keeps flavor better than a hot plate that “cooks” the coffee
A legendary example of “this is what drip can be” is the Technivorm Moccamaster. It’s not cheap, but it’s the machine that makes people understand why some drip coffee tastes restaurant-flat, and some drip coffee tastes like real craft coffee.
My “automatic drip at home” recipe (that works with most machines)
Here’s the reliable starting point:
- Coffee: 60 g per 1 liter water (or 30 g per 500 g water)
- Grind: medium (like coarse sand)
- Filter: paper (rinsed)
- Stir: gently stir the finished coffee in the carafe before serving
That final stir sounds silly, but it matters because extraction layers settle during brewing. Mixing them makes the pot taste more uniform.
How to upgrade automatic drip coffee without buying a new machine
If you’re using a basic machine, you can still improve results dramatically:
- Use fresher beans and grind fresh
- Use the right ratio (most people underdose)
- Rinse paper filters
- Preheat the carafe with hot water (helps keep brew temp stable)
- Clean the machine regularly (descale + remove old oils)
Small “pro” bullet tips for drip perfection
- If it tastes sour/weak: grind slightly finer or increase coffee dose
- If it tastes bitter/dry: grind slightly coarser or reduce dose
- If it tastes flat: check water quality and bean freshness
- If it tastes burnt: avoid hot plate warming for too long
The Manual Drip Brewing Method
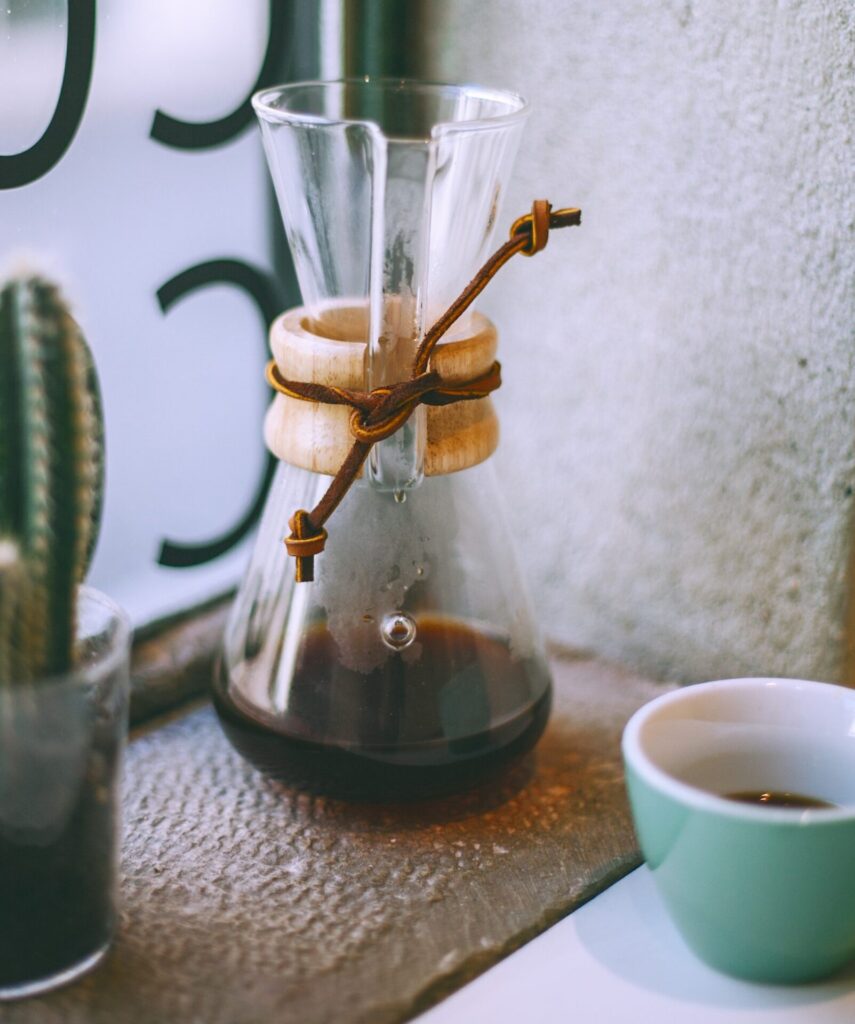
Manual drip is where coffee becomes a ritual. It’s still filter coffee, but you become the machine. You choose how the water meets the grounds—how fast, how evenly, how gently or aggressively.
This category includes classics like:
- V60
- Kalita Wave
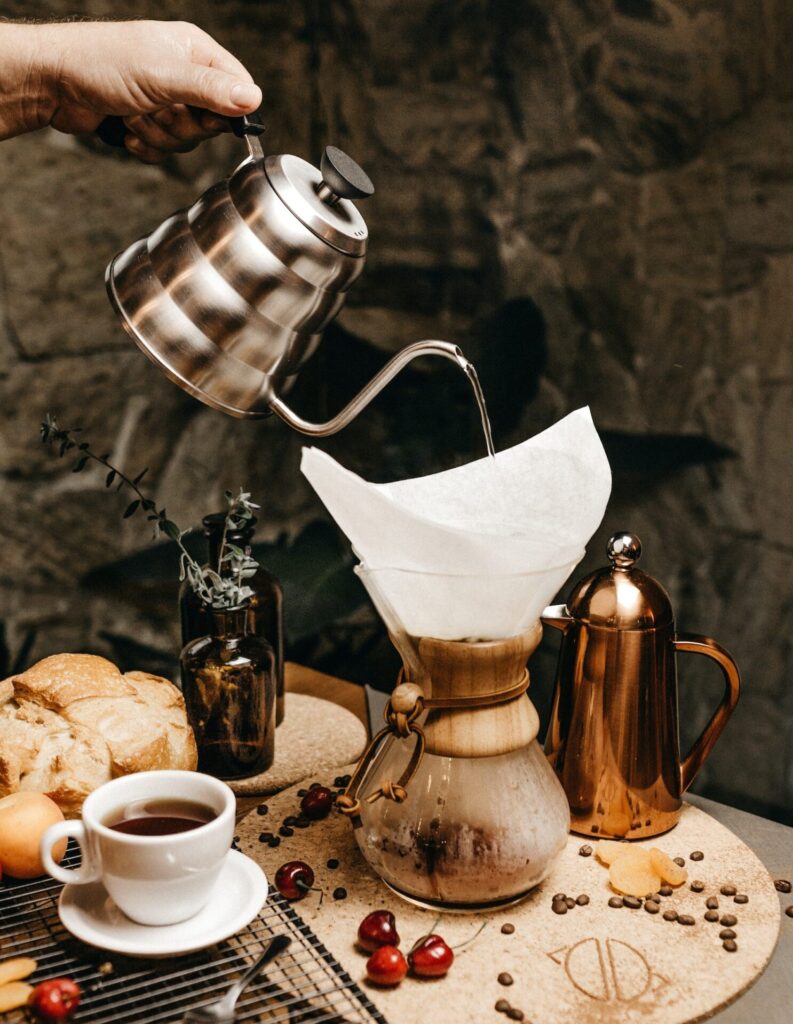
- Chemex
- Melitta-style cone drippers
- and lots of similar brewers
Why manual drip can taste more “alive.”
Because you can adjust the brew to match the coffee. Some beans want gentler pouring. Some want more agitation. Some want hotter water. Manual drip gives you that control.
And when it clicks, you get a cup that feels like it has dimension—like you can taste the story of the bean.
The two most common manual drip styles (and how they differ)
Cone drippers (like V60):
- fast flow potential
- highly responsive to pouring technique
- can produce extremely bright, clear cups
- Also, it’s easiest to mess up if your technique is inconsistent
A great dripper is the Hario V60.
Flat-bottom drippers (like Kalita Wave):
- more even extraction by design
- a bit more forgiving
- often slightly sweeter and rounder cups than V60
- great for “set-and-repeat” manual brewing
A popular choice is the Kalita Wave 185.
The kettle that makes manual drip easier
A gooseneck kettle isn’t a luxury. It’s basically your steering wheel.
The Fellow Stagg EKG is loved because it gives you temperature control and smooth pouring. If you’re brewing pour-over often, it’s one of those tools you stop thinking about because it just works.
A “barista-style” pour-over recipe (simple, consistent)
Let’s make it real and repeatable:
Dose & water
- 20 g coffee
- 320 g water (1:16)
Steps
- Rinse the filter and preheat the dripper
- Add coffee and level bed
- Bloom with 50 g of water for 30–45 seconds
- Pour 200 g by 1:15
- Pour to 320 g by 2:00–2:15
- Let it drain; target total brew time around 2:45–3:30
What this cup tastes like when you nail it
A great pour-over cup has:
- bright aromatics
- a clear sweetness
- a clean finish
- and a “sparkle” to the flavors
The same beans in a French press might taste deeper and heavier. In pour-over, they feel precise and lifted.
Manual drip troubleshooting (the honest version)

- Sour/sharp/thin: grind finer, pour slower, or use hotter water
- Bitter/dry/harsh: grind coarser, reduce total time, or slightly lower temp
- Hollow/bland: stale coffee, uneven pouring, or too much bypass (water slipping past coffee bed)
- Inconsistent: grinder quality or pouring rhythm is the issue
DETAILED bullet points that actually help your pour-over
- Keep your pour steady, not frantic
- Aim for even saturation across the coffee bed
- Avoid pouring only in the center (causes channeling)
- Don’t swirl aggressively unless needed (too much agitation can push bitterness)
- If you’re struggling, try a flat-bottom dripper—it’s more forgiving
The Cold-Press Brewing Method

Cold brew is not just “iced coffee.” It’s its own universe. The water is cold or room temperature, the extraction is slow, and the cup is typically:
- smoother
- lower perceived acidity
- often chocolatey, mellow, and easy to drink
But here’s the part people don’t talk about enough: cold brew can also be boring if you brew it too weakly or with the wrong beans. Great cold brew has richness and sweetness, not just “cold coffee flavor.”
How cold-press (cold brew) works
Coffee grounds steep in cold water for a long time—usually 12 to 24 hours—then you filter.
Because extraction happens slowly, it pulls a different balance of compounds than hot brewing. You often get a smoother profile, sometimes less bright acidity, and a heavier sweetness if your ratio is right.
Cold brew concentrate vs ready-to-drink
This matters a lot.
Concentrate (strong, then diluted):
- easier to store
- more flexible for drinks
- often tastes better because it’s not weak
Ready-to-drink (brewed at final strength):
- simpler, but can be underwhelming
- less flexible
My favorite cold brew concentrate recipe (rich and café-like)
Ingredients
- 100 g coffee (coarse grind)
- 600 g water (ratio 1:6)
Steps
- Add coffee to the container
- Add water, stir thoroughly
- Cover and steep 14–18 hours (room temp or fridge)
- Filter carefully
- Store concentrate in the fridge for 5–7 days
To serve
- Mix 1:1 with water or milk
- Adjust to taste: stronger if you like bold, weaker if you like smooth
A dedicated cold brew system that makes life easier
A classic home system is the Toddy Cold Brew System. It’s popular because it’s simple and designed specifically for clean filtration and concentrate brewing.
Cold brew flavor upgrades (these are small but powerful)
- Use medium or medium-dark beans for deeper sweetness
- Don’t brew too long (over-steeping can get woody)
- Filter well (fine sediment can make it taste chalky)
- Try a pinch of salt in the glass if it tastes flat (seriously—tiny pinch)
Cold brew drinks you can make at home (quick ideas)
- Cold brew + milk + a touch of brown sugar syrup
- Cold brew tonic (sounds odd, tastes crisp)
- Cold brew “latte” with oat milk and cinnamon
- Cold brew concentrate as a base for mocha-style iced drinks
The French Press Brewing Method
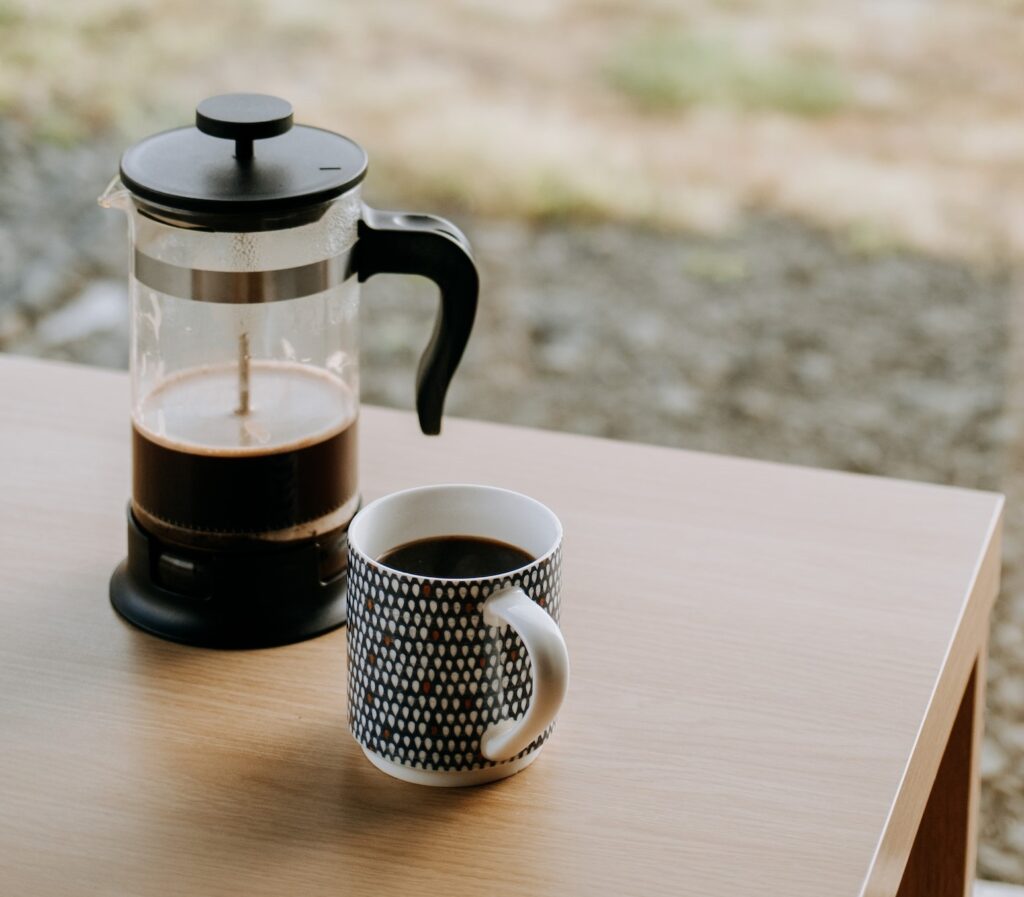
French press is a comfort coffee. It’s rich, round, full-bodied, and forgiving. When I want a cup that feels like it has weight—like it’s not trying to be delicate—French press is where I go.
But it has a reputation for “muddy” coffee, and that reputation is often deserved… if you brew it carelessly.
How the French press works
It’s immersion brewing: grounds steep in hot water, then you press a metal mesh filter down to separate the grounds from the liquid.
Because metal filters let oils and micro-fines through, French press coffee has:
- more body
- thicker mouthfeel
- sometimes more intense roast flavors
Why the French press can taste amazing
The French press makes coffee taste complete. Notes feel blended rather than separated. Chocolaty coffees become extra chocolaty. Nutty coffees become creamy and dessert-like.
It’s also fantastic for people who dislike the “sharpness” that some filter methods highlight.
A French press that brews cleaner than the average press
If you want a cleaner cup, an upgraded press like the ESPRO P7 French Press is designed to reduce grit and sediment compared to basic presses.
A French press recipe that avoids bitterness and sludge
Ingredients
- 30 g coffee
- 500 g water (1:16.6)
- Coarse grind (breadcrumbs/sea salt texture)
Steps (the “gentle press” method)
- Add coffee to the press
- Add all water and stir gently
- Put lid on (don’t press)
- Steep 4 minutes
- Break the crust gently with a spoon
- Let it sit 4–5 more minutes (yes, longer—but it settles fines)
- Press slowly
- Pour immediately (don’t let it sit on the grounds)
Why that extra settling time works
Those extra minutes let fine particles drop slightly, which makes the cup cleaner. It also reduces harshness because you’re not constantly re-extracting as it sits.
French press bullet tips that fix 90% of problems
- Press slowly (fast press stirs fines up)
- Pour immediately after pressing
- Use a slightly coarser grind than you think
- If it’s bitter, reduce steep time or grind coarser
- If it’s thin, increase the dose slightly
- If it’s gritty, improve filtration or let it settle longer
French press “style” variations
If you want a brighter cup, use:
- slightly hotter water and shorter steep
If you want a deeper cup, use: - slightly cooler water and longer steep (but don’t go extreme)
The Vacuum Pot Method
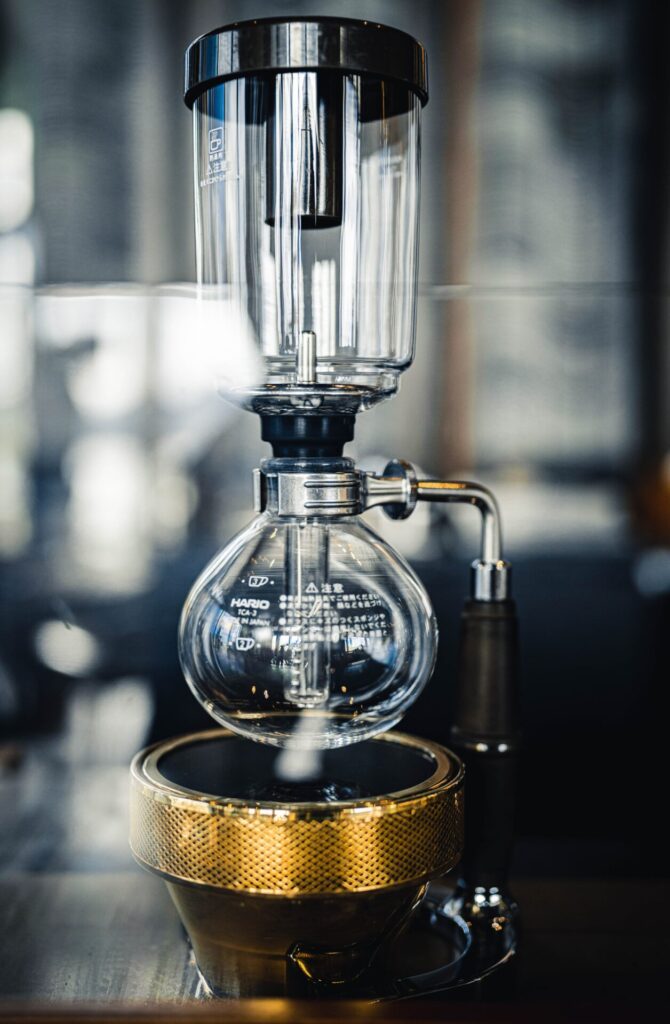
Vacuum pot brewing—often called siphon brewing—is one of the most mesmerizing ways to make coffee at home. It looks like a science experiment because it kind of is. But the best siphon coffee isn’t just “cool to watch.” It can be shockingly elegant: aromatic, silky, clear, and refined.
How siphon brewing works (in human terms)
A siphon brewer has two chambers:
- The bottom chamber holds water
- The top chamber holds coffee grounds
You heat the bottom chamber. As it heats, water rises into the top chamber. Coffee steeps up top. When you remove heat, the brewed coffee gets pulled down through a filter into the bottom chamber.
So it’s part immersion, part filtration, part vacuum drawdown. The extraction is often even, and the filtration can be very clean depending on your filter type.
What siphon coffee tastes like
A good siphon cup often feels:
- aromatic and “lifted.”
- clean but not thin,
- silky texture
- Almost polished, like the flavors were edited into harmony
It can make medium roasts taste sweet and elegant. Light roasts can become intensely aromatic. Dark roasts can become intense—sometimes too intense—so you usually adjust time and heat.
A popular siphon brewer to start with
The Hario Syphon Coffee Maker is a classic. It’s widely used, meaning you can find plenty of filter replacements and community advice.
Siphon recipe (beginner-friendly but excellent)
Ingredients
- 25 g coffee
- 400 g water (1:16)
- Grind: medium-fine (a bit finer than drip)
Steps
- Add water to the bottom chamber
- Assemble the siphon and ensure the filter is seated correctly
- Heat until the water rises into the top chamber
- Add coffee grounds, stir gently to saturate
- Brew 1:00–1:30 in upper chamber
- Remove heat; let the drawdown occur
- Serve immediately
Siphon variables that change everything
- Heat control: too aggressive = over-extraction and turbulence
- Brew time: longer = deeper, but can become bitter
- Stir/agitation: too much stirring = harshness; gentle is better
- Filter type: cloth gives more body; paper gives more clarity
Siphon troubleshooting (because yes, it can be fussy)
- If the drawdown is slow, the filter might be clogged or seated incorrectly
- If it tastes bitter: reduce brew time or heat intensity
- If it tastes weak: increase dose or slightly extend brew time
- If it tastes muddy, filter type or fines in the grind are the issue
The Middle Eastern Ibrik (Turkish) Method
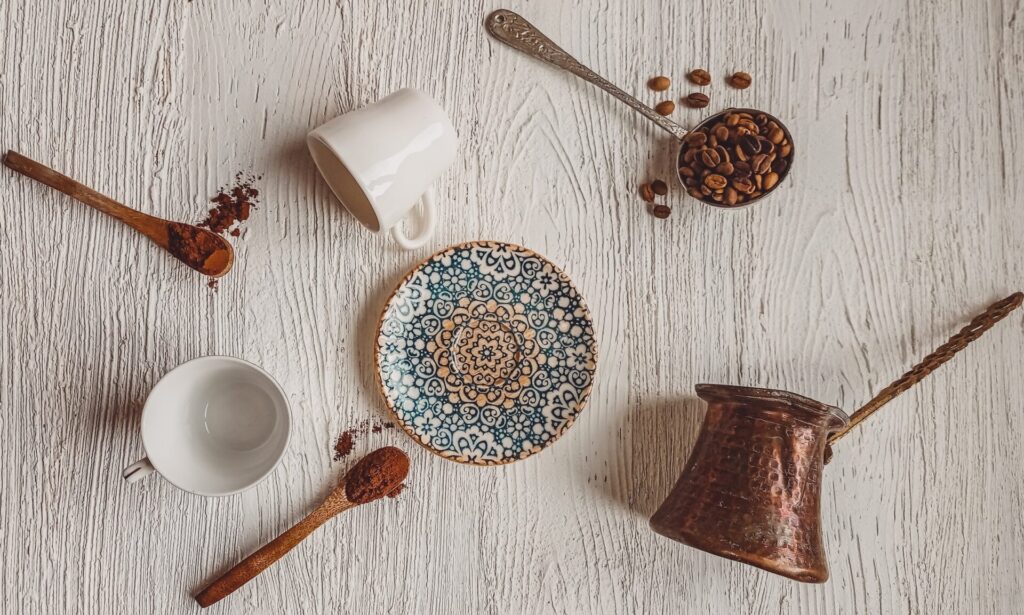
Turkish coffee isn’t just a brewing method. It’s a culture. It’s a mood. It’s a ritual. And if you’ve ever had truly well-made Turkish coffee—thick, aromatic, foamy, and sweet in a way that feels integrated—you know it’s not trying to imitate espresso or filter coffee. It’s its own thing entirely.
What Turkish/ibrik coffee is, really
Turkish coffee is brewed with:
- ultra-fine coffee (almost like powder)
- water
- often sugar (added before heating)
- sometimes spices like cardamom
It’s brewed in a small pot called an ibrik or cezve, slowly heated until foam rises, then poured with the grounds into the cup. The grounds settle. You drink carefully, leaving the sediment behind.
What it tastes like when done well
A great Turkish coffee is:
- dense and aromatic
- intensely flavorful
- slightly syrupy
- with a foam cap that feels like a signature
It can taste chocolatey, spicy, nutty, floral—depending on the coffee and whether you add cardamom or sugar.
The essential tool: the cezve/ibrik
A reliable option is the Coffee Gator Turkish Coffee Pot (cezve).
Turkish coffee recipe (traditional, detailed)
Ingredients
- 1 demitasse cup of water (about 60–70 ml)
- 1 heaping teaspoon Turkish-fine coffee (6–7 g)
- Sugar to taste (optional):
- no sugar (sade)
- little sugar (az şekerli)
- medium (orta)
- sweet (şekerli)
- Optional: pinch of cardamom
Steps
- Add water to the cezve
- Add sugar now (if using)
- Add coffee on top (don’t stir yet if you want a thicker foam method)
- Place on low heat
- Once coffee begins to sink and darken, stir gently to dissolve
- Continue heating slowly—watch closely
- As the foam rises, remove from the heat just before it boils over
- Spoon foam into cups if you want extra control
- Return to heat briefly to raise foam again (optional traditional step)
- Pour slowly into a cup, distributing foam
The biggest Turkish coffee mistakes (and fixes)
- Boiling hard: destroys foam and makes it harsh
- fix: low heat, patience
- Wrong grind: too coarse makes it weak and gritty
- fix: true Turkish grind
- Stirring too aggressively: foam breaks
- fix: gentle stir once early, then let it be
A few flavorful Turkish-style variations
- Cardamom Turkish coffee (a classic)
- Cinnamon pinch (warming, less traditional but lovely)
- A tiny drop of orange blossom water (careful—tiny)
Turkish coffee is forgiving in flavor, but it’s strict about heat control.
The Percolator Method
Percolators have an old-school reputation—camping coffee, diner coffee, “strong enough to wake the dead” coffee. And honestly, that reputation exists for a reason: percolators can easily over-extract and turn coffee bitter if you let them run too long.
But here’s the twist: a percolator can be satisfying and delicious when you treat it like a controlled process, not an endless loop.
How a percolator works
A percolator cycles boiling water upward through a tube and spreads it over coffee grounds repeatedly. That repeated cycling is the key difference from drip.
The danger: repeated brewing can over-extract coffee quickly.
The opportunity: if you control time and temperature, you can get a bold, comforting cup with real body.
What percolator coffee tastes like
When it’s done right, percolator coffee is:
- bold
- hearty
- slightly heavier and more old-fashioned in profile
- perfect for camping mornings, big breakfasts, and “I want strong coffee” days
When it’s done wrong, it tastes:
- bitter
- burnt
- harsh
- like you brewed the same grounds five times (because you kind of did)
A classic percolator option
A widely used home model is the Presto Stainless Steel Coffee Percolator.
Percolator brewing method (the controlled way)
Ingredients
- 30 g coffee per 500 g water (start here)
- Coarse grind (coarser than drip)
Steps
- Add water to the percolator
- Add coffee to the basket
- Heat until you see the first perking action
- Reduce heat to keep it gently perking—not violently boiling
- Brew for 5–7 minutes (this is the control point)
- Remove from heat and serve
How to dial percolator coffee without bitterness
- Keep the perk gentle
- Don’t brew too long
- Use a coarse grind
- Don’t use super-dark roasts unless you keep time short
- Serve promptly; don’t keep cooking it on the heat
Why people still love percolators
Because they match certain moods perfectly. If you’re making coffee for a campsite, a family gathering, or a morning where you want bold and nostalgic, percolator coffee can feel exactly right—like comfort in a cup.
A practical “which method should I choose?” guide
If you’re deciding what to invest in (or what to brew tomorrow morning), here’s the simplest, honest breakdown.
Choose Filter Drip if you want:
- consistent daily coffee
- multiple cups at once
- minimal fuss
- a method that works with almost any beans
Choose Automatic Drip if you want:
- the best convenience-to-quality ratio
- “Press button, get real coffee.”
- family or office-scale brewing
Choose Manual Drip (Pour-Over) if you want:
- clarity and flavor detail
- a relaxing ritual
- control and experimentation
- small-batch perfection
Choose Cold Press if you want:
- smooth, low-acid-feeling iced coffee
- make-ahead convenience
- coffee that works beautifully with milk and sweeteners
- summer coffee that doesn’t taste watered down
Choose a French Press if you want:
- body and richness
- round, comforting cups
- an easy method that still tastes “crafted.”
- a great method for chocolatey beans
Choose the Vacuum Pot if you want:
- aromatic elegance
- a showpiece method
- a refined cup with a silky texture
- a weekend ritual that feels special
Choose Turkish/Ibrik if you want:
- tradition, ritual, intensity
- thick, aromatic coffee
- an entirely different coffee experience
- a method that’s simple in ingredients but rich in technique
Choose Percolator if you want:
- bold, nostalgic coffee
- camping-friendly brewing
- a hearty cup with presence
- a method that rewards timing and restraint
My “home brewer’s cheat codes” (small habits, huge payoff)
These are the little moves that make every method taste more professional:
- Weigh coffee and water for one week, just to learn your taste
- Use fresh beans (and seal them properly)
- Grind fresh when you can
- Rinse filters
- Preheat brewers and mugs (heat loss can wreck extraction)
- Clean regularly (old oils = stale flavor)
- Change one variable at a time when dialing in
Coffee becomes easy the moment you stop treating it like magic and start treating it like cooking. Same joy—more control.
A few extra “worth it” home-brewing links (useful across methods)
If you’re building a home kit that covers most brewing styles, these tools are widely loved for a reason:
- A solid grinder: Baratza Encore
- A dependable scale: Hario V60 Drip Scale
- A gooseneck kettle for pour-over: Fellow Stagg EKG
- A great dripper: Hario V60
- A cold brew system: Toddy Cold Brew System
- A siphon brewer: Hario Syphon Coffee Maker