Coffee Roasting 101: A Beginner’s Guide to Roasting Your Beans
One Hundred Coffee is reader-supported, and some products displayed may earn us an affiliate commission. Details
If you love coffee, there’s nothing quite like roasting your beans. It’s a game-changer! Not only do you get the freshest coffee possible, but you also have total control over the flavor, roast level, and overall coffee experience. Roasting your beans turns coffee from a daily habit into an immersive craft. Whether you’re just dipping your toes into home roasting or looking to refine your technique, this guide will walk you through every step in a fun and approachable way. Ready? Let’s dive in!
Understanding the Basics of Coffee Roasting
Before we get into the hands-on roasting process, let’s break down what happens when you roast coffee. Essentially, you’re transforming raw, green coffee beans into rich, aromatic beans ready for brewing. This transformation depends on heat, timing, and a little bit of intuition.

The Three Phases of Coffee Roasting
- Drying Phase Freshly harvested coffee beans contain about 10-12% moisture, which must be dried out before the roasting process can fully begin. This phase is crucial because any remaining moisture can cause uneven roasting. The drying process typically takes about 4-8 minutes, depending on the roasting method and temperature. During this phase, the beans gradually heat up to around 300-320°F (150-160°C). As they heat, you will notice the beans changing from their raw green color to a pale yellow. This visual shift is an indicator that they are ready to enter the next phase.
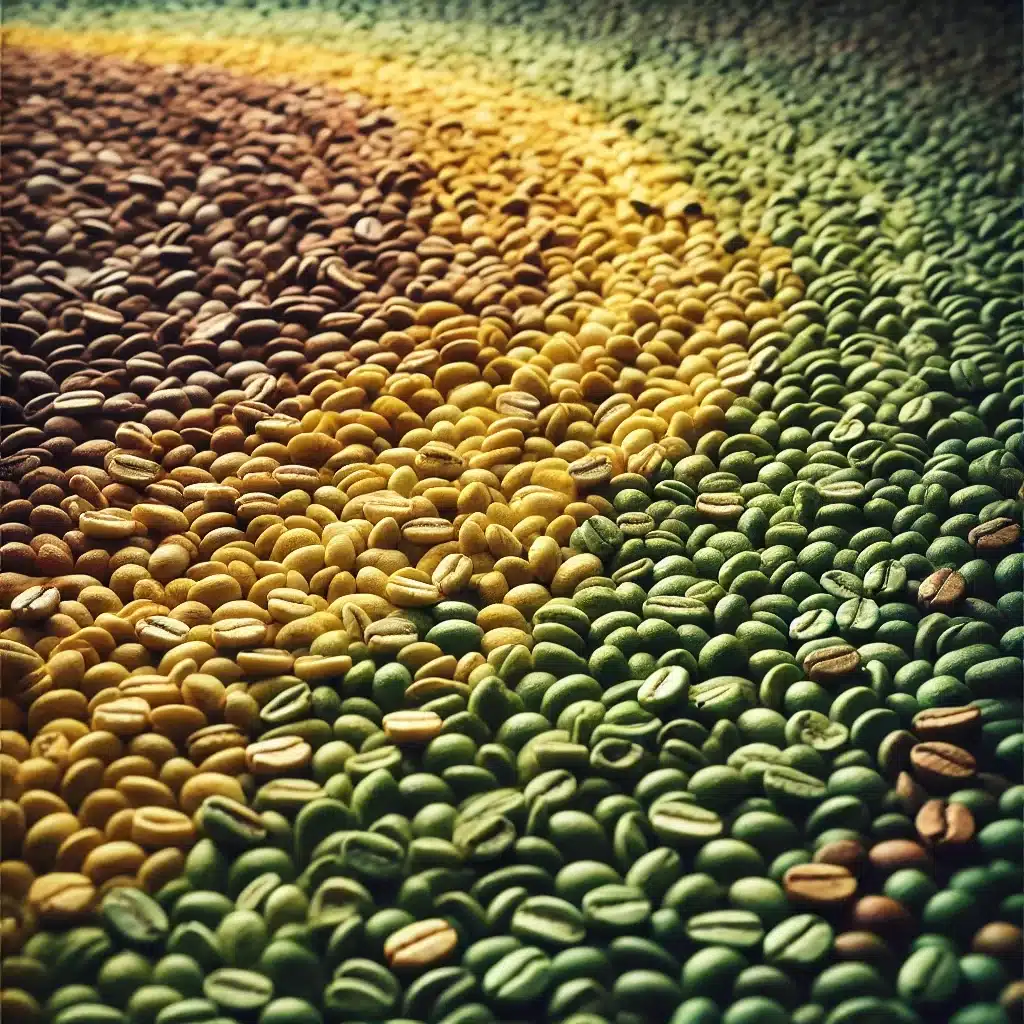
- Maillard Reaction and Caramelization Phase. This is where the magic happens! The Maillard reaction is a chemical process that occurs between amino acids and sugars when exposed to heat, leading to browning and flavor development. During this phase, the beans start to emit a pleasant coffee aroma. This is also when the first crack occurs, a pivotal moment in roasting. The beans will begin to expand and make a popping sound, much like popcorn. As the sugars in the beans caramelize, they take on deeper brown hues, and the flavors start to develop further. The length of this phase plays a huge role in determining the final flavor profile of the coffee.
- Development Phase (First and Second Crack) The first crack is an indicator that the beans have reached a light roast. If you prefer a brighter, more acidic coffee, you can stop roasting at this point. If you continue roasting, the beans will enter the development phase, leading to a darker roast. As roasting continues, a second crack occurs, which signifies the beans have reached a dark roast level. At this stage, oils begin to surface on the beans, and the flavor profile changes dramatically. Dark roasts tend to be bolder, smokier, and less acidic compared to lighter roasts.
Choosing Your Coffee Beans
A Quick Guide For The Best Selections
| Image | Product | Features | Price |
|---|---|---|---|
Best Sealing  | Best Sealing
| Price on Amazon | |
Best Overall  | Best Overall
| Price on Amazon | |
Best Everyday Light Roast  | Best Everyday Light Roast
| Price on Amazon | |
Best Organic Light Roast  | Best Organic Light Roast
| Price on Amazon | |
Best Taste  | Best Taste
| Price on Amazon | |
Best Package  | Best Package
| Price on Amazon | |
Best French Roast Coffee  | Best French Roast Coffee
| Price on Amazon | |
Best Taste  | Best Taste
| Price on Amazon |
The type of beans you use will have a huge impact on the final cup. Here are a few things to consider when selecting your beans:
Bean Varieties
- Arabica: Arabica beans are widely regarded as the superior coffee variety due to their smooth, complex flavors. They often feature subtle acidity and natural sweetness, making them a favorite among specialty coffee lovers.
- Robusta: Robusta beans are stronger, bolder, and have almost twice the caffeine content of Arabica. They tend to have a slightly bitter and earthy taste, which makes them great for espresso blends and instant coffee.
Flavor Profiles by Region
- South America (e.g., Brazil, Colombia): Beans from this region often have chocolatey, nutty, and well-balanced flavors. Colombian coffee is known for its mild acidity and smooth body, while Brazilian coffee has a naturally sweet and creamy profile.
- Africa (e.g., Ethiopia, Kenya): African coffees are famous for their fruity, floral, and complex flavor notes. Ethiopian coffee, for example, often has strong berry and wine-like characteristics, while Kenyan coffee is bright and citrusy.
- Asia (e.g., Indonesia, Vietnam): Beans from Asia tend to be bold, earthy, and sometimes spicy. Indonesian coffees, like those from Sumatra and Java, are known for their deep, syrupy body and low acidity. Vietnamese coffee, on the other hand, is often roasted dark and used for strong, rich brews.
Processing Methods
- Washed (Wet Process): Washed coffee is processed using water to remove the fruit layer before drying. This method produces clean, bright, and well-defined flavors, making it a popular choice for specialty coffee.
- Natural (Dry Process): In this method, coffee cherries are dried with the fruit still intact, allowing the beans to absorb more sweetness from the pulp. This results in a fruity and full-bodied coffee with a unique depth of flavor.
- Honey Process: This is a hybrid of the washed and natural processes. Some of the fruit pulp is left on the beans during drying, resulting in a coffee with balanced sweetness and acidity.

Picking the Right Roasting Equipment – A Quick Guide
| Image | Product | Features | Price |
|---|---|---|---|
Best Home Coffee Roaster  |
| Price on Amazon | |
Best All-in-One Roasting Bundle  | Fresh Roast SR800 Coffee Roaster Bundle – with a cooling tray |
| Price on Amazon |
Best Roast & Grind Bundle  | Price on Amazon | ||
Best Durable  |
| Price on Amazon | |
Best Budget  |
| Price on Amazon | |
Best Design  |
| Price on Amazon |
If you’re thinking about buying a coffee roaster—whether to start a micro-roastery, upgrade your café program, or simply push your home brews into “wow, I did that” territory—this guide is for you. I’ll walk you through the choices that actually matter, the trade-offs nobody tells you about, and the little bits of lived experience you only learn after burning a couple of batches (it happens). By the end, you’ll know exactly which type of roaster fits your space, your goals, your budget, and your learning curve—and how to choose a machine that won’t box you in six months from now.
Start With Why: Your Real Roasting Goal
Before specs and steel, get brutally clear about your primary goal:
- Learning & experimentation. You want to understand how charge temp, heat application, and airflow affect flavor—and you need responsiveness and logging to make sense of it.
- Supplying a household or office. Consistency, ease of use, and modest capacity (200–500 g per batch) keep you drinking fresh without drowning in smoke.
- Launching a side hustle. Throughput, repeatability, and basic quality control (data logging, probe accuracy) become essential. You’ll also care about serviceability and parts.
- Café-level production. Plan for electricity/gas, ventilation, and ergonomics. Your upgrade path and downtime risks matter more than “cool features.”
Write your goal down. It becomes your compass when specs start to blur together.
Drum vs. Fluid-Bed (Air) Roasters
Your first fork in the road: drum or fluid-bed.
- Drum roasters heat beans by contact with a rotating drum plus convection air. They’re classic, forgiving, and scale well. Think steady heat momentum, more “thermal inertia,” and a slightly gentler ramp. They shine for balanced development and chocolatey clarity.
- Fluid-bed roasters blast hot air through a bean column, suspending and agitating the coffee. They’re nimble, quick to heat/cool, and fantastic for learning how tweaks change flavor. Expect higher responsiveness, brighter fruit notes when you nail the curve, and faster roast times.
Rule of thumb: if you thrive on fast feedback and small-batch tinkering, air roasters feel like driving a responsive sports car. If you want classic profiles and a pathway to larger commercial machines, drums feel like a well-tuned touring bike.
Capacity: Don’t Buy Yourself Into a Corner
Batch size dictates everything from how much smoke you produce to how long a roast day lasts.
- 100–200 g: Perfect for learning and personal use. You’ll roast frequently but waste less if a batch goes sideways.
- 250–500 g: The sweet spot for advanced hobbyists and very small sales (friends, local pop-ups). Enough coffee for a week or two per roast session.
- 1 kg and up: Small commercial territory. Now you’re budgeting for ventilation, power, and a real workflow (cooling, destoning, packaging).
Pro tip: A machine’s stated capacity and its sweet-spot capacity are different. Most roasters perform best around 70–85% of their rated capacity, where the thermodynamics are predictable and the fan/heat controls have headroom.
Heating Source: Electric, Gas, or Induction
- Electric roasters are convenient and apartment-friendly (within reason). They usually require fewer facility changes and are quick to install.
- Gas (natural gas or propane) brings power and linear control to larger drums. Think stronger heat application and scalability.
- Induction is efficient, precise, and increasingly common in compact systems, though availability is still limited compared to electric/gas.
Focus on stability (can the heat source maintain consistent output roast-to-roast?) and responsiveness (when you dial back heat at first crack, does the bean temp trajectory actually respond in time?).
Airflow, Chaff, and Cooling: The Flavor Triage
Airflow isn’t just about smoke—it’s flavor management.
- Variable fan control lets you steer convection: more airflow can lift brightness and tidy up a smoky cup; too much can stall development.
- Chaff collection matters more than you think. A clean chaff path reduces fire risk and flavor contamination.
- Cooling speed is critical. Beans still “coast” after you drop them. A strong cooling tray or rapid air dump locks in your target endpoint.
When comparing machines, ask: How quickly can this roaster cool 300 g to ambient? The shorter the number, the more precisely you’ll hit your intended roast degree.
Thermocouples, Probes, and Data Logging
Repeatable roasting is built on good data:
- Bean Temp (BT) probe placement and mass: Light, fast-response probes give you clean Rate-of-Rise (RoR) curves. Heavy probes lag and can mislead your timing at the turning point and first crack.
- Environmental Temp (ET) helps you understand the heat “envelope.” Useful for anticipating momentum.
- Artisan or proprietary software: Logging time, BT, ET, RoR, and event markers (dry end, first crack, heat/air changes) lets you replicate your best work and improve your worst.
A roaster that exports clean telemetry (or natively supports Artisan) saves you months of guesswork.
Controls: Dials, Steps, or Continuous?
Heat and fan controls come in two flavors: stepped (discrete settings) and continuous (fine-grained). Continuous knobs (or highly granular steps) shine when you’re chasing delicate changes at first crack. On small air roasters, even a tiny change in fan speed can flip a roast from underdeveloped to spot-on. If you prioritize learning, pick finesse over convenience.
Ventilation and Smoke Management
Even small roasters produce real smoke and smell—delightful outdoors, less so indoors.
- Ducting: Short, straight runs with minimal elbows keep airflow strong. Stainless or rigid aluminum stands up to heat and oils.
- Filters and scrubbers: Electrostatic or activated carbon helps in apartments, but don’t expect miracles for high-throughput sessions.
- Afterburners: Overkill for home, common for commercial footprints. They reduce smoke/odor but add cost and power demands.
Budget time and money for safe smoke handling; it’s not optional.
Build Quality, Serviceability, and Parts
Any roaster is a system of consumables: motors, fans, bearings, belts, and thermocouples. Ask:
- Are parts easy to order? Is there an exploded diagram?
- How accessible are the chaff path, fan, and drum for cleaning?
- Are there user communities, videos, and forum support?
Machines that balance “sturdy enough” with “not a nightmare to open” will age better and cost less over time.
The Learning Curve: What It Actually Feels Like
Here’s how your first month typically goes:
- Week 1: Your roaster arrives; you roast too dark. (We all do.) You learn where the first crack happens and how quickly beans “run away” if you don’t respond.
- Week 2: You start logging data. You notice your favorite beans like higher charge temps than you expected. Your cooling routine gets faster.
- Week 3: Airflow clicks. You realize that changing fan speed 60–90 seconds before the first crack shapes the cup more than heat alone.
- Week 4: You nail two back-to-back batches within 1–2°F of each other. Suddenly, “consistent” isn’t a dream.
Pick a roaster that makes this journey obvious and repeatable.
Common Roaster Types (and Who They Suit)
| Roaster Type | Typical Batch Size | Flavor Tendency | Best For | Downsides |
|---|---|---|---|---|
| Compact Fluid-Bed (electric) | 80–200 g | Bright, expressive, fast | Learners, small apartments | Louder, smaller capacity |
| Mid-Size Fluid-Bed | 200–400 g | Responsive, clean | Tinkerers who love data | More smoke, needs airflow |
| Small Drum (electric) | 200–500 g | Balanced, classic | Home roasters leveling up | Slower to respond than air |
| Small Drum (gas) | 500 g–1 kg | Scalable, robust | Small business/café | Gas setup, ventilation |
| Manual Drum (stovetop/induction) | 80–300 g | Variable—skill dependent | Budget, hands-on learning | Inconsistent, laborious |
Matching Machine to Use Case
1) The Curious Learner
You want lots of reps with minimal fuss. A nimble air roaster with granular fan control and Artisan compatibility is perfect. You’ll roast small, often, and build instincts fast.
2) The Household Roaster
You need ~300–500 g per roast, with quick cooling and a manageable smoke footprint. A small drum with strong cooling (or a larger air roaster) keeps you stocked without marathon sessions.
3) The Side-Hustle Starter
You’ll roast multiple batches, maybe offer subscriptions, or supply a local stand. Look for parts availability, stable profiles across back-to-back roasts, and an upgrade path that reuses your accessories (destoner, scale, packaging).
4) The Café Program
Prioritize reliability and ergonomics: a gas drum with robust cooling, clear probe data, easy cleaning, and local service. Your daily roast routine should feel like a flow, not a fight.
Real-World Workflow (What a Good Roast Day Looks Like)
- Warmup & Calibration: Preheat until ET stabilizes. Run a small “sacrificial” charge to confirm your probe readings feel like last week’s. Clean any lingering chaff.
- Batch Rhythm: Charge, mark dry end, shape RoR to first crack, manage exothermic energy, and drop at your intended development. Cool immediately.
- Between Batches: Vacuum chaff, confirm the fan path is clear, and return to your target ET. Log everything.
- Post-Session QC: Cup the next day (rested), mark roast notes, and update recipes.
If a roaster makes those steps easy, it’s a keeper.
Budget Tiers (and What You Actually Get)
- Entry (<$500–$800): Simple air roasters or manual drums. Great for learning. Expect trade-offs in batch size, noise, or data features.
- Mid ($800–$1,800): Larger air roasters and small electric drums with better cooling, more stable power, and basic data integration.
- Prosumer/Light Commercial ($1,800–$6,000+): Gas-capable drums, robust cooling, accurate probes, and serviceable parts. Throughput jumps; so does the need for ventilation planning.
Spend where it matters: cooling, airflow control, probe quality, and data logging. Fancy skins won’t help your cup.
Maintenance: The Boring Secret to Better Coffee
A clean roaster is a predictable roaster. Build these habits:
- Chaff & exhaust: Vacuum every session. Chaff blockages cause scorching and uneven development.
- Drum and faceplate: Wipe oils regularly; baked-on residues affect heat transfer.
- Probes: Clean carefully (no bending) so they read accurately.
- Fans & bearings: Listen for changes. A weakening fan changes your airflow (and flavor) before it fails.
Put a calendar reminder in your phone. Future-you will thank you.
Safety and Sane Limits
- Never leave a roast unattended. The exothermic phase can escalate fast.
- Keep a metal lid handy and a Class K or ABC extinguisher nearby.
- Respect manufacturer batch limits. Overcharging a drum ruins air movement and flavors.
Safety is flavor insurance.
The Green Coffee Factor (It’s Half the Equation)
Roasting gear can’t fix bad greens. If you’re evaluating a new roaster and your coffee tastes flat, check the beans:
- Moisture and density affect heat absorption. Dense high-altitude beans often need more assertive heat early; airy beans scorch easily.
- Age and storage matter. Old greens’ mute sweetness and aromatics.
- Process (washed/natural/honey) changes how you manage airflow to avoid baked or astringent notes.
Log your greens like you log your roasts.
How to Read Spec Sheets Without Getting Hypnotized
When you browse listings, anchor on these:
- Usable batch size (not just max).
- Cooling power (time to room temp).
- Fan control granularity (stepped vs. continuous).
- Probe reporting (supports Artisan? USB/BT integration?).
- Clear maintenance access (chaff path, fans, drum).
If a spec sheet glosses over cooling or airflow, ask directly.
Try This: A Simple, Repeatable Learning Plan
- Pick one bean and a single target roast level (e.g., medium-light).
- Roast three batches, changing only one variable: airflow around first crack. Keep charge temp, heat schedule, and drop temp constant.
- Cup is blind the next day. Write down sweetness, acidity, and finish. Which batch is cleanest and most expressive?
- Repeat with heat changes this time, airflow constant.
You’ll discover what your machine likes—and that’s the shortest path to dependable, delicious coffee.
Best 3 Selections for Getting Started Right
Rotated, varied picks to match this guide’s focus. Each is broadly available in the U.S. marketplace and aligns to different goals and spaces.
MAGO MAGA Roaster

Who is this for?
This coffee roaster is for home brewers who want hands-on control without commercial-level complexity. Ideal for beginners exploring roast profiles or hobbyists wanting fresher beans. It’s a great fit for small-batch experimentation, learning roast levels, and maximizing flavor at home — all in a compact, user-friendly, and transparent design.What we loved
We loved the transparent roasting chamber, one-touch controls, and built-in auto-cooling system. It’s lightweight, quiet, easy to clean, and a great entry-level roaster with solid functionality.Final verdict
A simple yet effective home coffee roaster offering great value for beginners and hobbyists. Delivers fresh results and a fun roasting experience in a small footprint.The MAGO MAGA Roaster is a nimble air roaster that makes learning fun and fast. With an adjustable fan and heat, you can watch cause-and-effect in real time and build intuition quickly. It’s a 6–8 oz sweet-spot batch size that keeps smoke manageable while producing enough coffee for a few days. Cooling is brisk, so you’ll hit your intended roast degree with less “coast.” Pair it with a simple Artisan logging setup (via community-shared mods/cables) and you’ve got a responsive, repeatable trainer that won’t overwhelm a small kitchen or apartment.
Kaldi Wide (Gas Drum, Small Format)

Who is this for?
The KALDI Wide is ideal for serious coffee hobbyists ready to roast with more control and power. It’s suited for intermediate to advanced users who want gas-powered roasting with temperature probes and full visibility. Ideal for those who value artisan roasting and batch customization from home.What we loved
We loved the stainless steel build, real-time temperature control, and professional-style drum system. It offers commercial features in a compact form, perfect for learning and mastering roasting techniques at home.Final verdict
A powerful, semi-pro roaster for dedicated users. It bridges home and commercial roasting with hands-on control and excellent build quality. Perfect for passionate coffee explorers.Kaldi’s compact gas drums are rugged, straightforward, and gratifyingly hands-on. You’ll need a compatible burner and a sensible ventilation plan, but in return, you get responsive gas control, a real drum feel, and profiles that translate well if you ever step up to a larger shop roaster. With common-sense probe placement and a simple logging hookup, you can chase consistent 300–400 g batches, practice airflow/heat balance, and learn classic development timing. It’s a great choice for the serious hobbyist flirting with small-scale sales.
DYVEE Manual Drum (Stovetop/Induction)
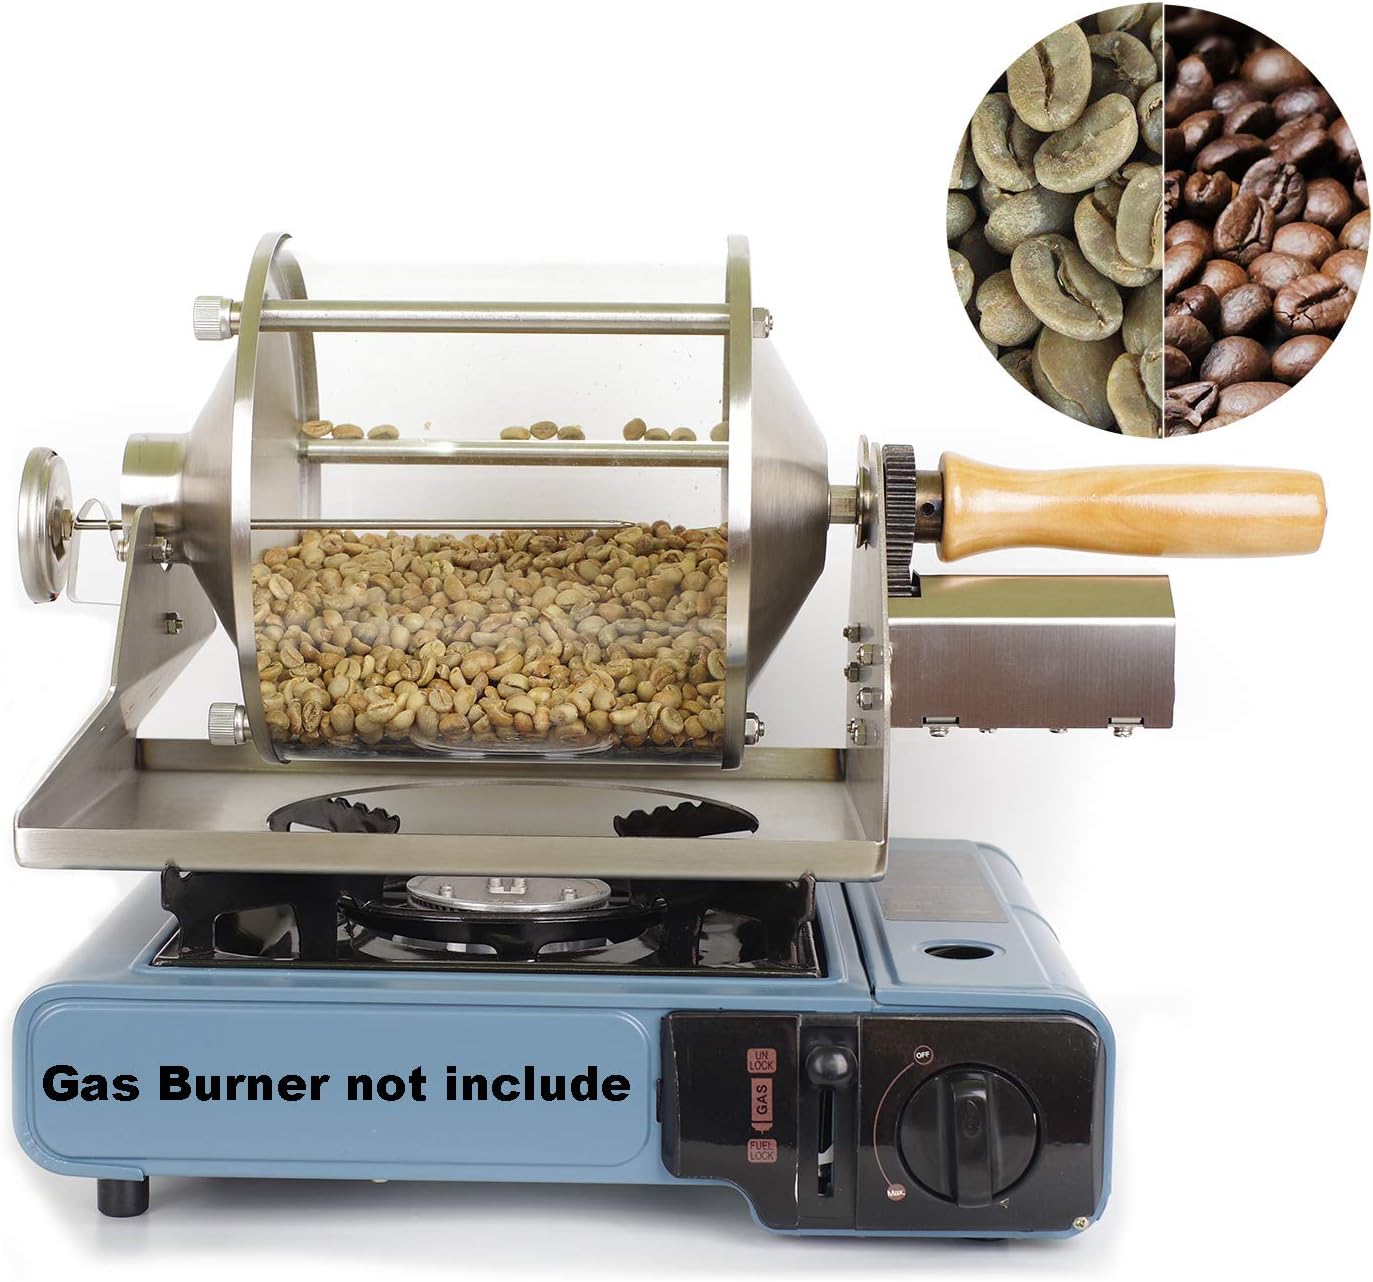
Who is this for?
The DYVEE Manual Drum Roaster is made for hands-on coffee lovers who enjoy full control over their roast. It’s ideal for hobbyists, DIY roasters, and small-batch enthusiasts. Perfect for experimenting with roast profiles over open flame, it suits those seeking an authentic, immersive, and budget-friendly roasting experience.What we loved
We loved its stainless steel build, transparent quartz window, and real-time roast control. Simple, mechanical, and flame-powered — perfect for users who want tactile feedback and zero electronics.Final verdict
A fun, hands-on roaster that gives total control. Great for learning the roasting process. Best for tinkerers and traditionalists who enjoy analog tools and experimentation.For the hands-on learner on a tight budget, a manual drum is pure cause-and-effect. You feel momentum, hear the first crack clearly, and learn how airflow (your hood fan) and heat shape the cup. Batch sizes are modest (100–300 g), but repeatability is respectable if you log times and keep a steady crank. Cooling is a DIY step—set up a mesh tray and a small fan—and chaff cleanup is simple. This path won’t automate your success, but it will teach you how beans behave, which pays dividends on any future machine.
Head-to-Head Feature Snapshot
| Feature | Fresh Roast SR800 | Gene Cafe CBR-101 | Kaldi Wide (Gas) | Behmor 2000AB+ | DYVEE Manual |
|---|---|---|---|---|---|
| Type | Fluid-bed (air) | Hybrid drum | Gas drum | Electric drum | Manual drum |
| Sweet-Spot Batch | 180–225 g | 200–250 g | 300–400 g | 250–350 g | 100–300 g |
| Control Feel | Very responsive | Balanced, steady | Gas-precise | Friendly presets | Fully manual |
| Cooling Speed | Fast | Good | Excellent (with tray) | Good | DIY dependent |
| Best For | Learning fast | Home consistency | Serious hobby/side hustle | Household roasting | Budget & fundamentals |
(Batch ranges are practical sweet spots; follow each maker’s official guidance.)
Sample Upgrade Paths That Make Sense
- SR800 → Gene Cafe or small gas drum when you crave smoother momentum and larger back-to-back runs.
- Gene Cafe → 1 kg gas drum if you’re inching into sales and need throughput with familiar drum logic.
- Kaldi → 1–2 kg commercial drum once local demand solidifies and your workflow (cooling, packaging) is ready.
Plan to reuse what you can: scales, color reader, cupping gear, green storage, and maybe even your ducting or afterburner if you’ve invested there.
Space, Power, and Noise Reality Check
- Kitchen counter: Air roasters fit, but the noise can be vacuum-cleaner-level. Do sessions in windows of household peace.
- Garage or balcony: More forgiving for smoke and ducting runs. Watch ambient temps—cold garages need longer warmups.
- Dedicated room: Treat it like a lab. Good lighting, heat-safe surfaces, a clear fire plan, and ample power outlets.
Measure your space. Tape out the roaster footprint, ducting path, and cooling tray reach. If your roast day feels ergonomically smooth, you’ll do it more—and roast better.
Roast Profile Basics (That Actually Improve Cups)
- Charge a little hotter than you think for dense beans; the early game is about building momentum without tipping/scorching.
- Drying to yellow: Aim for a clear, steady climb; avoid stalls.
- Maillard: Manage your RoR to keep sweetness building. A too-steep climb can blow past nuanced browning.
- First crack: Anticipate the exothermic pop—reduce heat slightly beforehand so the RoR doesn’t spike uncontrollably.
- Development: Time and end temp shape the body and finish. Short dev can taste pointy; long dev can mute brightness.
Write your targets down, then compare notes across three consecutive roasts. Small, consistent changes beat big experiments.
Quality Control Without Fancy Labs
- Color meter if budget allows; otherwise, build a roast tile chart with ground coffee images under consistent lighting.
- Cupping routine: One standard recipe; one note sheet. Cup 24 hours post-roast for baseline, then at 72 hours for peak.
- Brew validation: Pull a pourover and an immersion brew. If both tastes aligned with the cupping notes, your roast is on-message.
Consistency is your brand—even if your only “customer” is Tuesday morning you.
Buying New vs. Used
New gets you a warranty, clean probes, and a known history. Used can stretch your budget—but inspect:
- Fan strength, drum alignment, probe integrity
- Chaff/exhaust cleanliness (look for baked oils)
- Electrical connections (no DIY splices)
- Proof of life: a video of a full warmup and a roast to first crack
Price the “hidden costs”: replacement probes, bearings, or a thorough deep clean.
Environmental Considerations
- Energy: Shorter roast times and efficient cooling save watts (and improve flavor).
- Filters: Change on schedule; clogged filters increase heat demand and risk.
- Waste: Compost chaff; store greens in reusable containers; recycle packaging.
- Sourcing: Roast gear you’ll actually keep is greener than chasing frequent upgrades.
Small choices multiplied by many roast days matter.
Troubleshooting Quick Hits
- Rapid, grassy acidity: Increase development slightly; ensure cooling is truly fast; reduce airflow early if your roasts taste stripped.
- Flat, baked cups: Check for RoR stalls mid-Maillard; preheat more consistently; avoid dragging the roast after first crack.
- Tipping/scorching: Lower charge temp or reduce heat in the first minute; verify drum speed and airflow aren’t too low.
- Inconsistent batch-to-batch: Clean probes, stabilize preheat, and log exact fan/heat changes with timestamps.
Most problems are airflow or momentum—solve those, and the cup follows.
A Short Personal Note on the “Feel” of Good Gear
The best roaster I ever used at home wasn’t the fanciest; it was the one that made my choices obvious. When I nudged airflow before the first crack, I could taste the difference the next day. When I cleaned chaff like a ritual, roast curves behaved. That feedback loop—machine to cup to notes—builds confidence. Buy the roaster that helps you feel that loop early.
Final Checklist: What to Confirm Before You Buy
- Does the sweet-spot batch size match my weekly drinking or sales?
- Is cooling fast and repeatable?
- Do I get granular control of heat and airflow?
- Can I log data reliably (Artisan or built-in)?
- What’s the ventilation plan (and cost)?
- How easy is maintenance (chaff, probes, fans)?
- Are parts and support available and clear?
If you can answer those with confidence, you’re not just buying a roaster—you’re setting up a roasting habit you’ll actually love.
Comparison Table: At-a-Glance Decision Helper
| Priority | Best Match | Why |
|---|---|---|
| Fast learning, small batches, limited space | Fresh Roast SR800 | Highly responsive controls, quick cooling, minimal footprint |
| Quiet(er) home roasting with classic profiles | Gene Cafe CBR-101 | Gentle hybrid drum behavior with solid visibility and consistency |
| Hands-on craft with an eye toward sales | Kaldi Wide (Gas) | Real drum skills, scalable logic, strong cooling with proper setup |
| Household convenience and smoke control | Behmor 2000AB+ | Friendly presets, smoke suppression features, good capacity |
| Budget fundamentals and tactile learning | DYVEE Manual Drum | Teaches heat/airflow from first principles, low entry cost |
The Bottom Line
Picking the right roasting equipment is less about chasing the “best” machine and more about choosing the right partner for your goals. If you buy for how you’ll roast 80% of the time—your space, your batch rhythm, your learning style—you’ll be happier, cup after cup. Prioritize cooling, airflow control, probe quality, and data logging; plan your ventilation like it’s part of the roaster (because it is); and give yourself a month to learn the feel of your machine. The reward is a roast you’re proud to drink and confident to repeat.
1. Popcorn Popper (Budget-Friendly DIY Method)

Who is this for?
The Salbree Microwave Popcorn Popper is for snack lovers who want fast, oil-free popcorn at home. Great for kids, college students, and movie-night fans, it’s collapsible, BPA-free, and dishwasher-safe. No messy bags—just pour in kernels and pop. A must-have kitchen tool for healthy, hassle-free snacking anytime.A simple and affordable way to start roasting at home is by using a popcorn popper. These devices are inexpensive and easy to use, making them perfect for beginners. However, they don’t offer precise temperature control, which can lead to uneven roasting.
2. Stovetop Roasting (Skillet or Pan)
Who is this for?
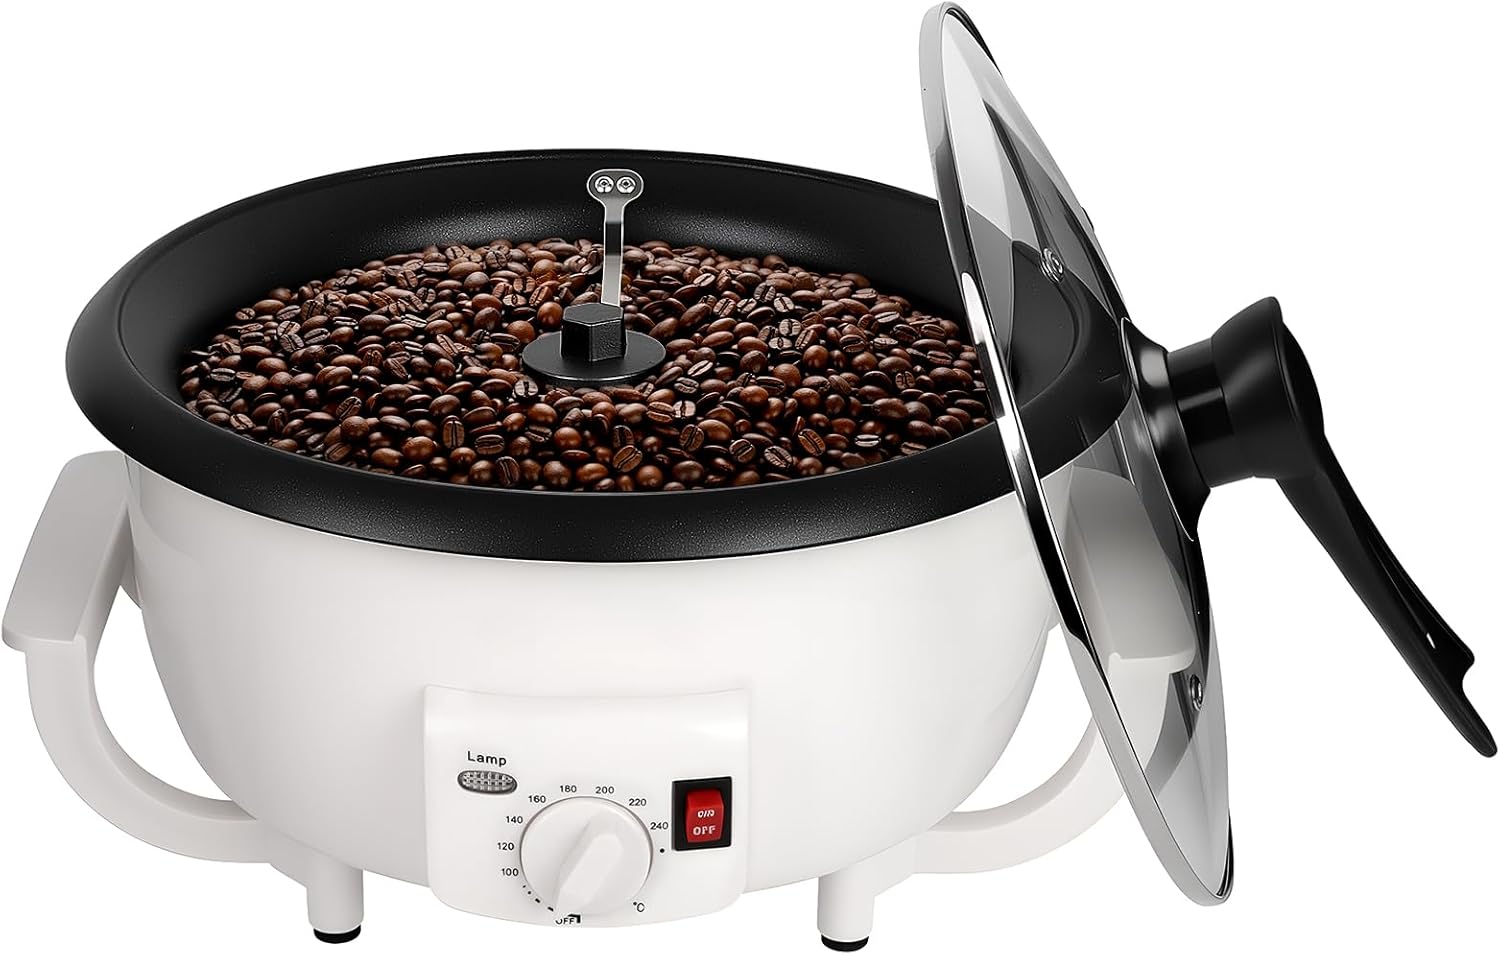
This Electric Coffee Bean Roaster is perfect for DIY coffee lovers who want full control over flavor and roast level. With a 1200g capacity, it’s ideal for households, small cafés, or passionate home baristas. Roast green beans to perfection at home—fresh, aromatic, and tailored exactly to your taste.Roasting in a skillet or pan is another budget-friendly method. This technique requires constant stirring to ensure even roasting, but it can be tricky to achieve uniform results. If you go this route, pay close attention to temperature and color changes.
3. Oven Roasting

Who is this for?
The JAVASTARR Electric Coffee Roaster is built for beginners and pros looking for a compact, easy-to-use roasting solution. With one-touch operation, 110V–120V compatibility, and even heating, it’s perfect for roasting green beans at home. Great for small-batch enthusiasts who want full control without the complexity of commercial machines.Using an oven is one of the easiest ways to roast coffee at home. However, because the beans are stationary on a baking sheet, they may not roast evenly. Stirring frequently and monitoring the temperature are key to getting a good roast.
4. Dedicated Home Coffee Roasters

Who is this for?
This Ceramic Coffee Roaster is for traditionalists who enjoy the art of stovetop roasting. With a manual crank, extended handle, and heat-resistant ceramic build, it’s great for slow, small-batch roasting at home. Ideal for adventurous coffee lovers who want a hands-on, unplugged experience from green bean to aromatic roast.
Price on AmazonIf you’re serious about coffee roasting, investing in a dedicated coffee roaster is the best option. These machines offer precise temperature and airflow control, resulting in consistent and high-quality roasts. Though more expensive, they provide the best roasting experience for coffee enthusiasts.
Final Thoughts
Roasting coffee at home is more than just a hobby; it’s a craft that puts you in control of your coffee experience. Whether you love a bright and fruity light roast or a rich, dark brew, learning how to roast your beans means you get to customize every cup to your liking.
It might take a few tries to get it just right, but that’s part of the fun! Experiment, take notes, and tweak your process as you go. And remember, the best cup of coffee is the one that tastes perfect to you.
So grab some green beans, fire up your roaster, and start your journey to making the freshest coffee you’ve ever had. Happy roasting!


