Common Coffee Roasting Mistakes and How to Avoid Them

One Hundred Coffee is reader-supported, and some products displayed may earn us an affiliate commission. Details
If you’ve ever stared at a cooling tray and thought, “Why does this batch taste flat while last week’s sang?”—welcome to the club. Roasting coffee is part craft, part science, and part intuition built on reps. I’ve burned, baked, and underdeveloped more beans than I care to admit, and every mistake taught me something that the pretty roast curves rarely reveal on their own. What follows is a friendly, hands-on guide to the most common roasting mistakes I see (or have made), why they happen, how they taste in the cup, and the exact moves that help you avoid them next time. I’ll keep the tone human and practical; you won’t find lab-coat jargon here—just field-tested fixes you can use on your next batch.

Perfect for lovers of intense, dark roasts and those who want a full-bodied brew with minimal effort. Great for anyone who prefers their mornings bold and their coffee organic.
1) Starting With the Wrong Green Coffee
The Best Green Coffee Beans List at A Glance

Perfect for home roasting enthusiasts, organic lifestyle followers, or DIY coffee brewers who enjoy experimenting with roast profiles from scratch.

Designed for connoisseurs of African single-origin coffees, home roasting explorers, and anyone seeking lively, fragrant flavor in their daily cup.

For environmentally-conscious coffee drinkers and artisan home roasters who want to reduce their carbon footprint while enjoying a bold, satisfying brew.
The mistake: Treating all green coffee as equal. Old stock, poorly stored beans, or coffee with hidden defects force you to roast around problems, not toward flavor.
How it tastes: Flat, papery, woody, or hollow sweetness that never “blooms” no matter how pretty the curve.
How to avoid it:
Buy fresh-crop greens from a seller who lists harvest dates, moisture content, and water activity when possible. Store your greens cool, dry, and dark—sealed, off the floor, and away from temp swings. If you’re stuck with older lots, plan for a slightly shorter drying phase and a gentler heat application to avoid drawing out stale, woody notes.
2) Skipping Green Sorting
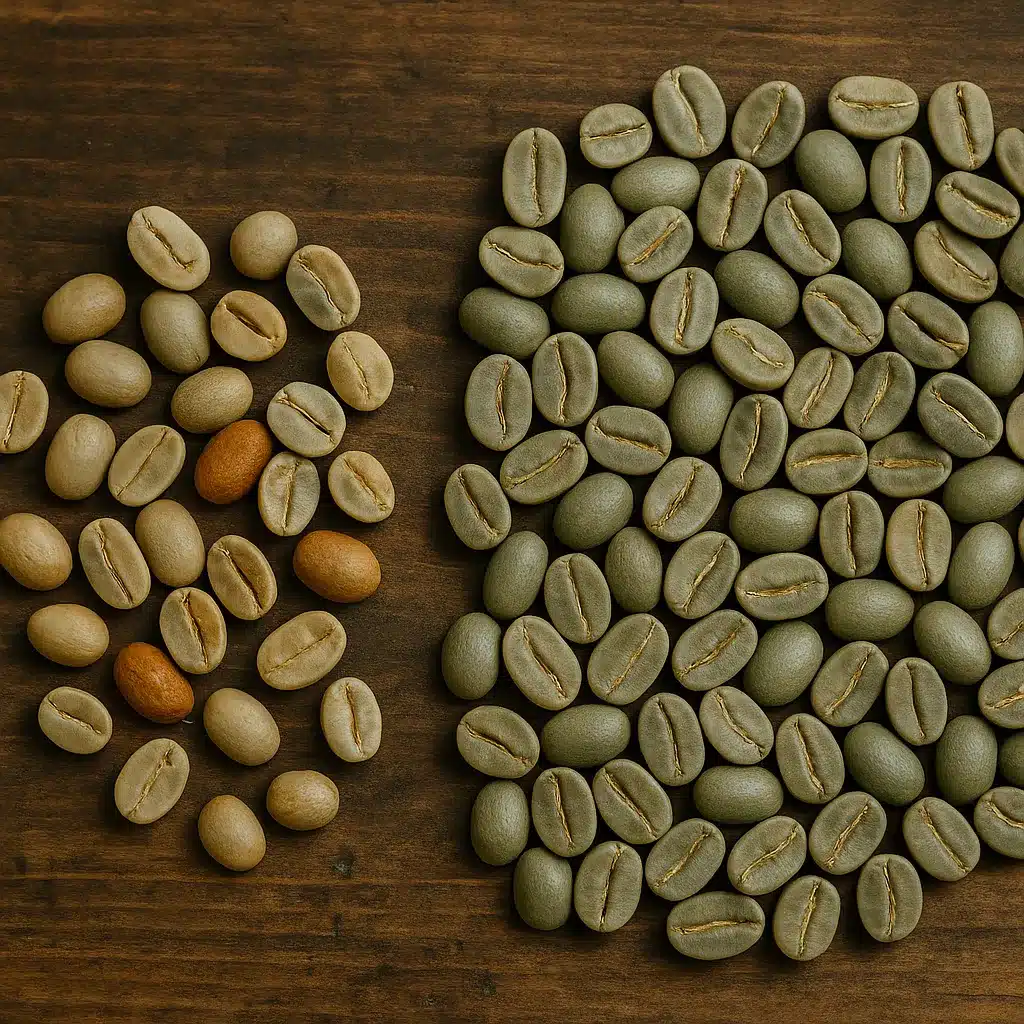
The mistake: Dumping a bag straight into the hopper. Stones, quakers, insect damage, and broken beans slip through and scorch first.
How it tastes: Random bitterness, harsh spots, or a strange “char” note that shows up mid-sip.
How to avoid it:
Quickly hand-sort before roasting. It takes two minutes to pull out broken beans, obvious defects, and anything that isn’t a bean. It’s shockingly effective at reducing weird cup spikes.
3) Charging Too Hot or Too Cold
The mistake: Using the same charge temperature for every bean and batch size.
- Too hot a charge scorches the seed surface before the core warms.
- Too cold charge delays energy, flattening momentum and inviting a late roast “flick.”
How it tastes:
- Scorching: Burnt paper, acrid edges, sharp, harshness at the front of the sip.
- Under-charged: Dull, bready, underdeveloped, with a lingering rawness.
How to avoid it:
Use a charge band that respects density, process, and batch mass. Dense, high-grown washed coffees tolerate higher charge; lower-density naturals want gentler starts. If you downsize your batch, drop the height accordingly so you don’t over-accelerate the early rate of rise.
4) Neglecting the Drying Phase (Turning Point to ~300°F / 150°C)
The mistake: Either racing through drying or crawling forever. Both make Maillard (the browning phase) harder to control.
How it tastes:
- Too fast: Patchy development, “zippy” acidity without sweetness.
- Too slow: Baked, muted aromatics that never lift.
How to avoid it:
Aim for a drying window that sets up a steady, declining rate of rise (RoR). For many drum roasters, that’s roughly 3–5 minutes, depending on batch and machine. You don’t want flat RoR or a spike; you want a gentle slide that gives you room to steer later.
5) Maillard Mismanagement (Caramelization Without Sweetness)

The mistake: Thinking color equals flavor. If Maillard is rushed, you get tan beans with thin taste; if it’s stretched without energy, you get brown beans without sparkle.
How it tastes:
- Rushed Maillard: Pointy acidity, tea-like body, “where’s the sugar?”
- Overlong/low energy Maillard: Cardboardy, baked, or roast-flat.
How to avoid it:
Use Maillard to build sweetness and body. That usually means maintaining enough energy to keep RoR gently descending—never flatlining—until first crack approaches. If you keep adding airflow while dropping gas, you can starve the bean; keep the gas sufficient to feed reactions, and tune airflow for smoke management and evenness.
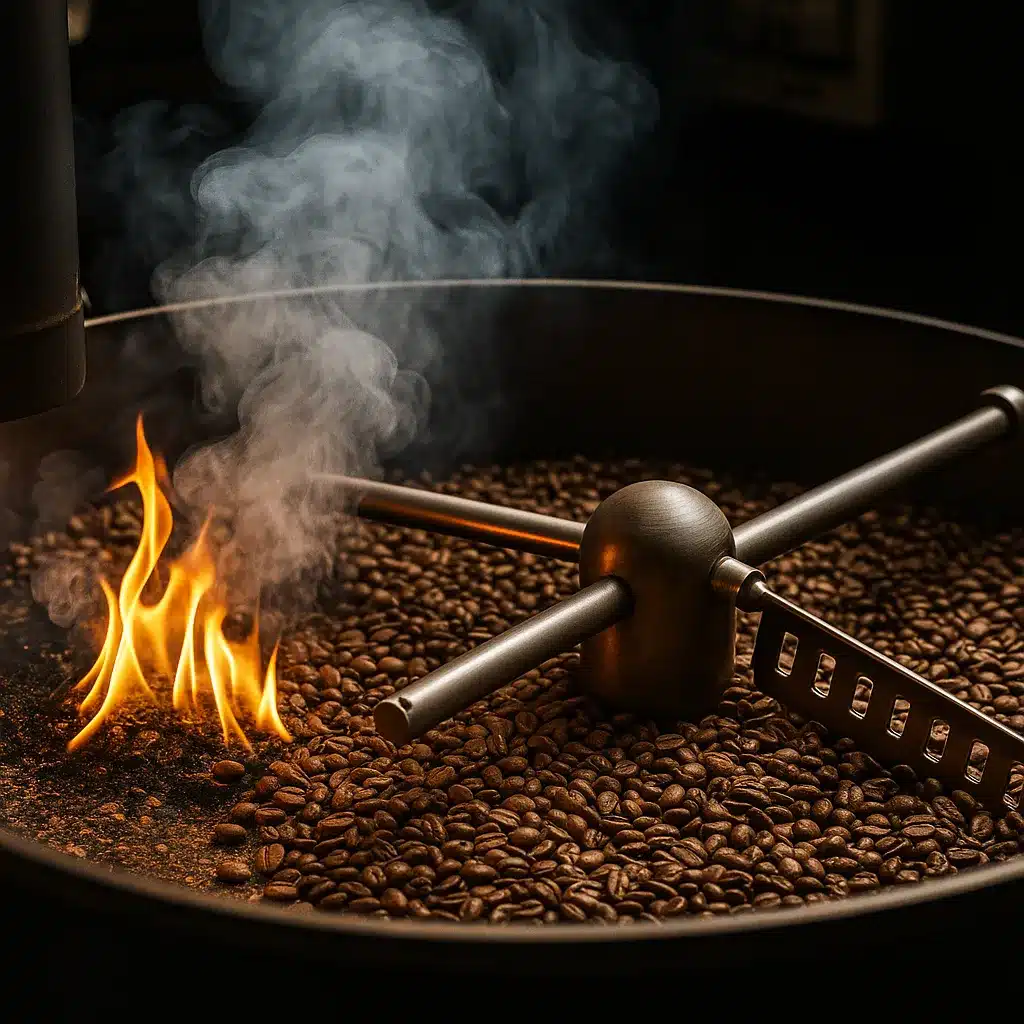
6) First Crack Panic
The mistake: Overreacting at first crack—cutting too much heat or too much airflow and crashing the roast, or failing to reduce energy and creating a late “flick.”
How it tastes:
- Crash: Hollowness, baked finish, muted aroma.
- Flick: Bitter edge in the finish, rough aftertaste, “roast bite.”
How to avoid it:
Plan your first-crack approach. Start easing gas before the first crack so you’re not slamming the brakes. Keep airflow consistent to vent steam and smoke. Your goal is a smooth, declining RoR through development—with no sudden valley (crash) or late uptick (flick).
7) Too Little (or Too Much) Development After First Crack
The mistake: Chasing several seconds or a “development percentage” without tasting. Different coffees need different post-crack time and energy.
How it tastes:
- Underdeveloped: Grainy, peanutty, lemon-pith sour that milk can’t cover.
- Overdeveloped: Bitter chocolate, ashy, or smoky with collapsed fruit.
How to avoid it:
Decide your target flavor first (juicy and bright vs. chocolatey and cozy), then build a development window that achieves it without crashing or flicking. Cup your roasts side-by-side with a 10–20 seconds difference in development and let your tongue, not a single metric, choose the winner.
8) Scorching and Tipping

The mistake: Aggressive heat early, poor drum speed, or uneven bed contact causing dark “leopard spots” (tipping) or charred surfaces (scorching).
How it tastes: Char, soot, or a bitter “burnt toast” snap at the front.
How to avoid it:
Reduce charge or early gas on lower-density beans, verify drum speed is not too slow, and use airflow to keep beans moving freely. If you see tipping, your early RoR likely peaked too high; lower the initial energy.
9) The Dreaded Bake
The mistake: Letting the roast stall—RoR flattens or goes near-zero for a stretch, often from over-reducing gas without compensating airflow or from under-charging.
How it tastes: Lifeless, like coffee that forgot its lines—no pop, no finish.
How to avoid it:
Never allow RoR to plateau. Make small, earlier adjustments. Keep some energy in the system post-crack so you can land your target without stalling.
10) Airflow Confusion
The mistake: Using airflow like a flavor knob rather than a tool for heat transfer and smoke removal. Too low and you bake; too high and you strip heat.
How it tastes:
- Too low airflow: Smoky, muddled cups.
- Too high airflow: Thin, underdeveloped sweetness.
How to avoid it:
Find a steady baseline for your machine. Increase slightly as beans yellow and expand to evacuate chaff and smoke. Avoid seesawing. If you drop gas, don’t simultaneously spike airflow to the point you chill the system.
11) Batch Size Mismatch
The mistake: Roasting a tiny batch with “big batch” settings or maxing out the drum because “capacity says it fits.”
How it tastes:
- Too small: Jerky RoR, scorching risk, inconsistent development.
- Too large: Sluggish roast, baked edges, smoke taint.
How to avoid it:
Stay within the machine’s sweet spot (often 60–80% of capacity). If you must go small, lower charge and early gas to avoid runway RoR spikes; if you go big, raise charge moderately and keep energy steady to prevent stalls.
12) Ignoring Environmental Temp and Humidity
The mistake: Roasting the same profile on a rainy morning and a hot afternoon as if the room doesn’t exist.
How it tastes: Profiles that wander—one day sharp, the next day heavy.
How to avoid it:
Note ambient temp/humidity. On cold days, you’ll need more energy; on hot days, a touch less. Log the environment so you can predict and compensate.
13) Calibrating Probes (Or Not)
The mistake: Trusting probe readings blindly. Offset, lag, and placement vary by roaster.
How it tastes: You chase numbers that don’t match bean reality, producing inconsistent flavor.
How to avoid it:
Know your probes. Compare BT/ET behavior to what you hear (first crack timing) and see (color). Apply consistent offsets and focus on curve shape and milestones more than absolutes.
14) Overreliance on Color Alone
The mistake: Dropping when the color “looks right” regardless of development trajectory.
How it tastes: Two batches with identical color but wildly different cups—one lively, one baked.
How to avoid it:
Use color as confirmation, not command. Track how you got there: RoR path, first-crack behavior, total development. Taste your way to the color that works with that path.
15) Not Resting Coffee Properly
The mistake: Judging a roast 30 minutes after drop and writing off the coffee.
How it tastes: Spiky, gassy cups early; muted later if you wait too long with poor storage.
How to avoid it:
Rest light roasts 3–7 days; medium/dark 2–5 days (general guidance, taste to confirm). Store in a valved, opaque bag or airtight container. Avoid sunlight and heat. If freezing, portion and thaw sealed.
16) Poor Storage (Green and Roasted)
The mistake: Greens in the garage, roasted coffee near the oven, open bags on the counter.
How it tastes: Stale, papery, lifeless.
How to avoid it:
Greens: cool, stable, sealed. Roasted: airtight, opaque, room temp. If you need to keep roasted coffee longer than two weeks, portion and freeze; thaw unopened to prevent condensation.
17) Changing Two Variables at Once

The mistake: Drop charge and airflow, and gas, then wonder which change helped.
How it tastes: Unpredictable from batch to batch.
How to avoid it:
Adjust one lever at a time—preferably early enough to matter but small enough to observe. Note the outcome. Build your profile like a staircase, not a trampoline.
18) Neglecting Cupping and Side-by-Side Tasting
The mistake: Drinking a latte and calling the roast “great.” Milk hides everything.
How it tastes: You won’t know. That’s the problem.
How to avoid it:
Cup your batches blind, side-by-side, including a control roast you trust. Log descriptors, not just scores. Taste the next day too. The point is not to be formal—it’s to be consistent.
19) One-Profile-Fits-All Thinking
The mistake: Forcing a washed Ethiopia and a natural Brazil through the same profile because “it usually works.”
How it tastes: The Ethiopia loses florals; the Brazil turns smoky or sour.
How to avoid it:
Start from a house style, but tailor charge, early energy, and development to the bean’s density and process. Let the coffee tell you where it wants to go.
20) Ignoring Defects You Can Roast Around (But Shouldn’t)
The mistake: Cranking heat to mask potato defect or over-fermented naturals.
How it tastes: The defect still peeks through—plus now you’ve added roast bitterness.
How to avoid it:
If the green has a defect, the best “fix” is not to roast it. Failing that, keep development clean, avoid smoky buildup, and accept that the ceiling is lower.
21) No Safety Routine
The mistake: Chaff fires, unplugged vents, and loves nowhere in sight.
How it tastes: Like a day you don’t want to repeat.
How to avoid it:
Empty chaff collectors, confirm ventilation, keep a class K or ABC extinguisher nearby, and set a simple pre-roast checklist. Calm roasters roast better coffee.
22) Espresso Tunnel Vision (or, “Why Does It Taste Sour?”)
The mistake: Roasting too light for your gear or your audience, then blaming the coffee.
How it tastes: Sour shots that never balance, even with long yields.
How to avoid it:
If your goal is café-style milk drinks, build a slightly longer Maillard and a modestly longer development without crashing. You want sugar density and a rounded acid profile that carries in milk. Save the ultra-light single-origin profiles for baristas who love to tinker.
23) Overdarkening to “Fix” Problems
The mistake: Taking everything into a second crack to hide underdevelopment or unevenness.
How it tastes: Smoke and char overshadow origin; bitterness lingers.
How to avoid it:
Fix the foundation instead: charge, early energy, airflow, and consistent RoR. Dark can be delicious, but it should be a choice, not a cover-up.
24) Failing to Respect Process Differences
The mistake: Treating naturals, honeys, and washed coffees the same.
How it tastes: Naturals get muddy; washed coffees feel shrill; honeys swing between both.
How to avoid it:
Naturals: slightly gentler charge, manage early energy to avoid scorching sticky surfaces; keep airflow honest to clear smoke. Honeys: somewhere between washed and natural; watch for tipping early. Washed: denser beans often love a bit more chargbuttbt still need smooth RoR.
25) Inconsistent Drum Speed and Agitation
The mistake: Sluggish agitation early, then bumping speed late.
How it tastes: Uneven patches—some beans race, others lag.
How to avoid it:
Pick a drum speed that keeps the bed buoyant without launching beans. Keep it steady through drying and Maillard; adjust minimally later if your machine needs it.
26) Chasing Internet Curves Instead of Your Palate
The mistake: Copying a profile chart you found online and expecting magic.
How it tastes: Mediocre, because your machine, probes, and airflow aren’t that machine.
How to avoid it:
Borrow ideas, not absolutes. Replicate shapes (declining RoR, stable Maillard, smooth development), not exact timestamps. Taste, adjust, repeat.
27) Overlooking Roast Loss and Density Shifts
The mistake: Dropping by color but ignoring mass and density changes.
How it tastes: Inconsistent extraction at the bar—one bag fines up, the next gushes.
How to avoid it:
Track roast loss percentage (weight loss) and feel bean brittleness. If loss spikes, expect faster grinder settings at the café. Use that data to keep the endpoint consistent across batches.
28) Forgetting the Brewing Reality
The mistake: Roasting for cupping only, then wondering why café brews taste different.
How it tastes: Good on the cupping table, fussy in pour-over or espresso.
How to avoid it:
Brew your roast in the way customers will drink it. Pull shots, make milk drinks, run batch brews. If your target use is espresso, test it as espresso before you bless the profile.
29) Not Logging Anything
The mistake: “I’ll remember what I did.” You won’t. Not in three weeks.
How it tastes: Inconsistent, with no breadcrumb trail back to the good batch.
How to avoid it:
Log charge temp, gas/airflow moves, first-crack time, development time, ambient temp, batch size, and tasting notes. A scrappy notebook beats a perfect memory.
30) Giving Up Too Soon
The mistake: One bad roast and you abandon the coffee.
How it tastes: Like regret, because the second try could have been the sweet spot.
How to avoid it:
Change one lever. Taste. Change again. Most coffees have more than one delicious landing zone; you only need to find one.
Best Equipment for Better Home Roasting
If your goal is to avoid the mistakes above, a few reliable tools and roasters make the journey smoother. These are widely listed on Amazon and pair well with the advice in this guide:
- FreshRoast SR540 Home Coffee Roaster – Compact, responsive, and beginner-friendly fluid-bed roaster that teaches you heat and airflow control without overwhelming complexity.
- Kaldi Stainless Steel Home Coffee Roaster (Wide Model) – A sturdy drum-style roaster with solid agitation and controllability; great for learning classic drum profiles and managing steady RoR.
- Nuvo Eco Ceramic Hand Roaster – Surprisingly capable manual roaster for tiny batches; perfect for learning the sounds and smells of first crack, and for testing small green samples.
- ThermoPro Digital Instant-Read Thermometer – Not a roaster, but an essential sanity check for charge and environment temps so your profiles behave from season to season.

Ideal for home roasters, beginners, and coffee enthusiasts who want fast, clean roasting without heavy equipment.

Best for experienced users seeking hands-on control, customization, and deep roasting flavor profiles.

For those who enjoy artisanal roasting by hand — perfect for minimalists or travelers with fire-safe access.

Great for roasters, grillers, or chefs needing fast and accurate temperature reads indoors or outdoors.
A Simple, Repeatable Workflow That Prevents Most Errors
Here’s the routine that saved me from chasing my tail:
- Prep the space: Chaff collector empty, ventilation on, scale zeroed, notebook open.
- Check the green: Quick sort. Confirm you’re roasting a fresh crop or adjust expectations if not.
- Pick a starting plan: Charge temp and gas based on bean density and batch size. Write it down.
- Drying phase focus: Aim for a gentle, controlled climb; don’t let RoR spike or sag.
- Maillard steady: Keep a declining RoR—not flat, not falling off a cliff—and manage airflow for clean aromatics.
- First crack calm: Ease the heat before the crack starts. Hold a smooth decline through development. No crash, no flick.
- Drop on purpose: Choose your flavor goal, not a number.
- Rest properly: Don’t judge hot. Taste on day two and day four.
- Cup side-by-side: Compare small variations (10–20s development difference) to learn what this coffee wants.
- Adjust one lever: Refine charge, early gas, or post-crack energy—one at a time. Repeat.
Do this for three batches and you’ll understand your coffee far better than scrolling through a hundred roast graphs.
Troubleshooting by Taste (Fast Field Guide)
- Sour, lemon-pith, cereal grain: Underdevelopment or rushed Maillard. Add post-crack time or maintain more energy in Maillard.
- Bitter, ashy, smoky tail: Overdevelopment or late flick. Reduce endpoint or maintain a steadier decline through development.
- Flat, cardboard, “baked goods” without sweetness: RoR stall/bake. Keep energy steadier post-crack; don’t over-reduce gas.
- Sharp edges at sip start: Scorching/tipping. Lower charge or early gas; verify drum speed.
- Muddled, smoky aromatics: Poor airflow or chaff management. Increase airflow modestly; clear chaff earlier.
Personal Notes From the Cooling Tray
The biggest leap in my roasting came when I stopped asking, “What temperature should I drop?” and started asking, “What flavor do I want, and how can I get there without crashing or flicking?” That mindset liberated me from numbers and brought me back to senses—smell at yellowing, the “wood-to-bread” aroma shift, the timing and vigor of first crack, the way the beans feel rolling in the trier. I still chart curves, but the curve follows the coffee now, not the other way around.
A second leap came when I accepted that some coffees want to be easygoing chocolate and others want to be citrus fireworks. Forcing every bean into one style made me fight the coffee; letting the coffee lead made my logs—and my mornings—much happier.
Frequently Asked “Why Is My Roast…?” Questions
Why is my roast uneven in color?
Uneven bed movement, hot spots, or too-aggressive early heat. Improve agitation (drum speed/airflow), lower charge a touch, and smooth the early RoR.
Why does my coffee taste great hot, but fall apart when cool?
Either underdeveloped sweetness or baked structure. Try adding 10–20 seconds of post-crack development while keeping the RoR decline steady (no crash).
Why are naturals always smoky for me?
Likely low airflow during chaff-heavy stages. Raise airflow after yellowing to keep smoke moving out while maintaining enough gas to avoid a stall.
Why can’t I repeat a great roast?
You changed more than one variable or ignored ambient conditions. Log every move, note room temp, and replicate the sequence, not just the endpoint.
Putting It All Together
Roasting is a conversation with a seed. You bring heat and air; the bean answers with aroma, expansion, sound, and color. Most mistakes happen when we stop listening—when we force heat, let fear drive a post-crack crash, or chase a screenshot instead of flavor. If you start with sound green coffee, respect the early phases, keep a gentle declining RoR, treat first crack like a turn—not a panic button—and rest and cup with intention, your hit rate will soar.
You don’t need a perfect machine, just a consistent routine and the willingness to taste your way forward. The good news is that coffee is generous; it will tell you, sip by sip, what you did right and what to tweak next time. Keep your notebook handy, rotate those Amazon picks when you need new gear, and let your palate be the profile you trust most.
Happy roasting—and may your next batch be the one you can’t stop talking about.


