How to Froth and Steam Milk for Making Perfect Coffee Latte
OneHundredCoffee is reader-supported, and some products displayed may earn us an affiliate commission. Details
Everywhere in the world, milk and coffee have been combined for decades. Our modern way of life, which includes a wide variety of inventive coffee drink recipes, reflects the diversity and high caliber of our way of life. Whatever the coffee drink recipe, whipped cream or milky froth might be the ideal garnish, whether it is served cold or hot. There is something to be said for pairing milk and cream with the brew to prepare a perfect coffee latte, whether you want your coffee robust and dark, cool and creamy, or white and frothy.
Milk makes it different.

While a good cup of coffee should be consumed black, without milk, sugar, or other flavorings, milk is undoubtedly the ideal complement and is consumed by millions of coffee drinkers every day for having the Perfect Coffee Latte.
Preparing your perfect cream for a Perfect Coffee Latte

Modern coffee concoctions like frothy cappuccinos and hot lattes, which are prepared from a variety of milk types, ranging from creams down the milk fat scale to roughly 1 percent and skim milk, require the dairy component to be completed. There are various schools of thought on the best kind of milk to use during frothing. A new espresso language has emerged as a result of these milk variations, which vary in terms of the amount, quality, and style of milk used in the drinks.
Choosing Good Types of Milk
Whether the milk is whole, low-fat, or fat-free, it can all be steamed, but the flavor and texture may vary. Low-fat milks make a lot of foam, but they sometimes have a dry, crisp texture. Full-fat milks will be smooth and creamy but may produce less foam. Even non-dairy milks like lactose-free, almond, hazelnut, and soy milk will foam and steam. Although rice milk does not make a lot of foam, those who are allergic to nuts can use it as a substitute. Some of these milks appear to heat more quickly than dairy products, and the froth may also be less stable or smooth.
STEAMING your milk
The first piece of advice is to do better. Practice using more milk than you would likely need to make your drink. This allows you to do experiments before the temperature rises to an unsafe level, and you must stop. The best place to start is with a one-liter pitcher half-filled with milk, provided that your machine’s steam wand can reach the milk’s surface. Any smaller than this can be challenging because the milk heats up too quickly for you to become acclimated to how it moves and how quickly you should add air.

Preparing the steamed milk
Steamed milk has been cooked by the use of steam or another heat source to a temperature just below boiling. There isn’t much aeration or pumping of hot air into the milk; therefore, the volume of the milk stays the same, and there isn’t much foam.
Frothed Milk Preparation
Milk that has been foamed or frothed has been heated and aerated by having hot steam sprayed onto the surface of the milk. As a result, the milk acquires the right consistency of extremely light whipped cream thanks to a micro-foam of tiny air bubbles.
How to make the ideal steamed milk: a detailed step-by-step guide to prepare a Perfect Coffee Latte

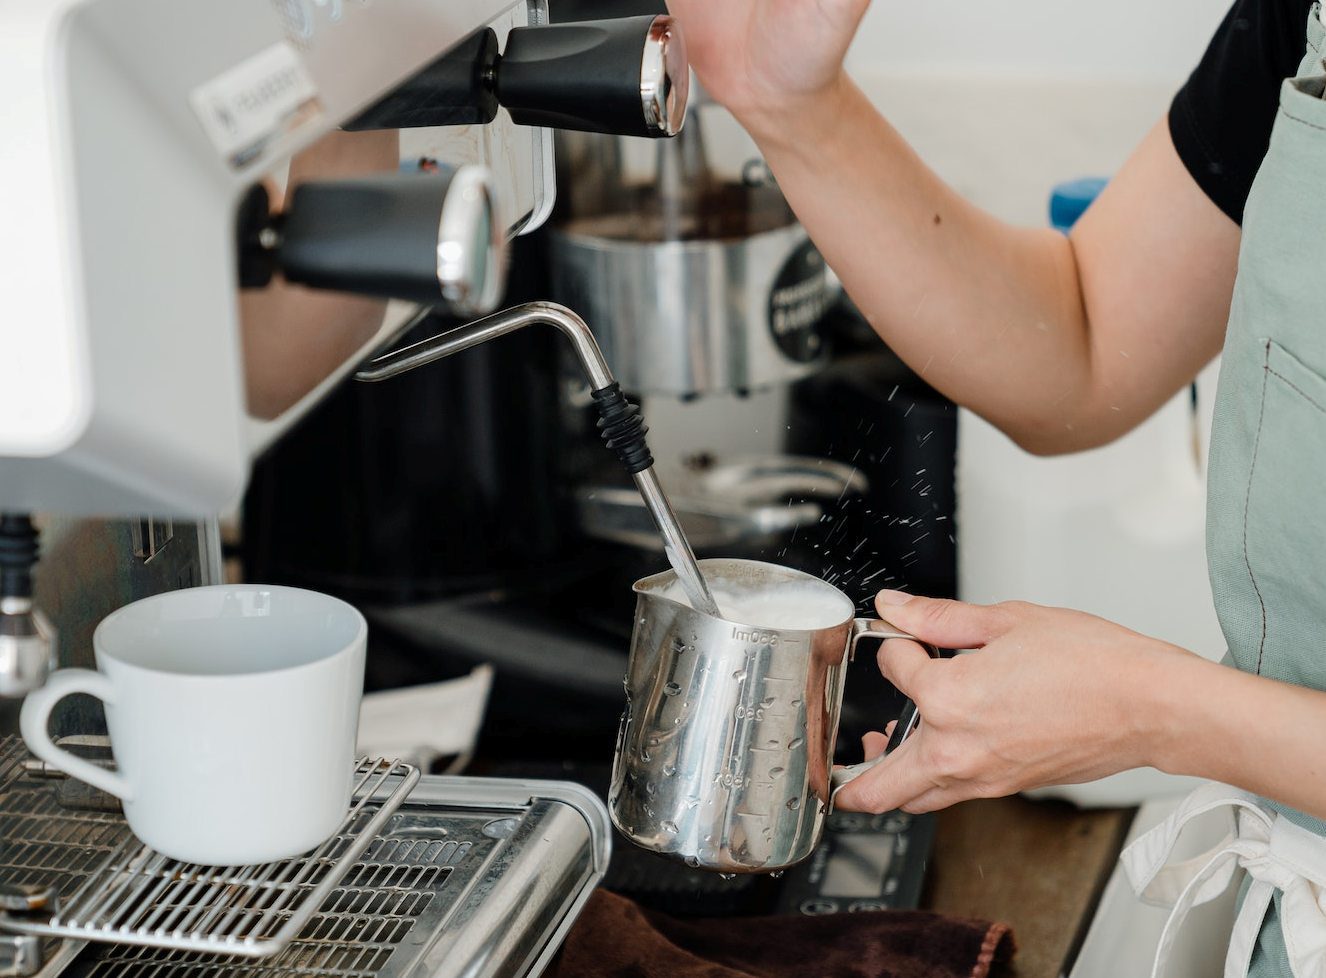
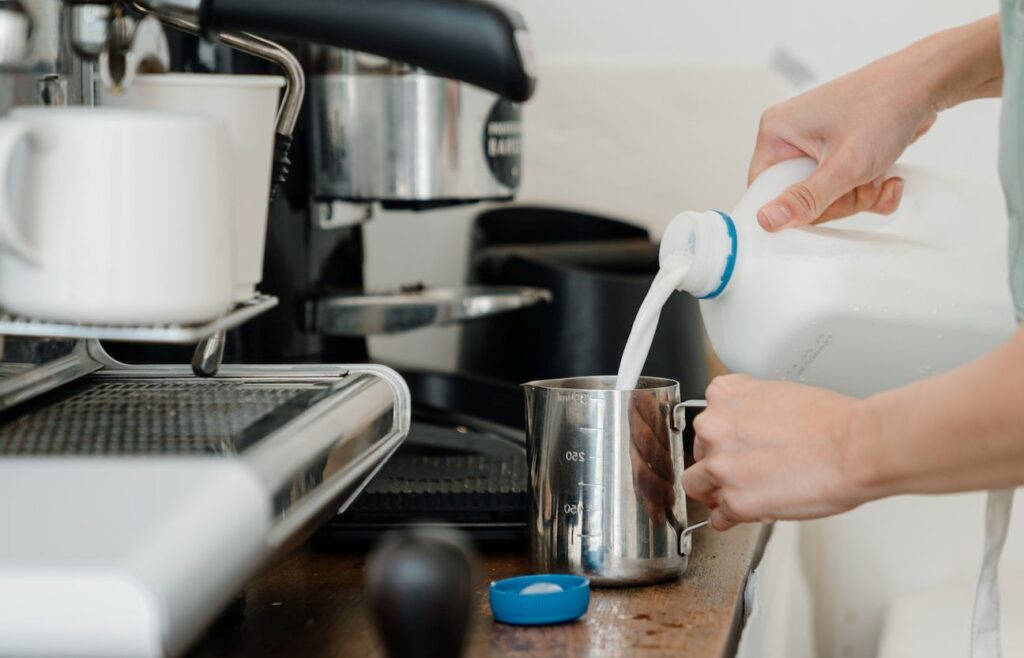
- You should first utilize a steaming pitcher with a tiny taper at the top since the milk needs space to swirl and foam up without spilling. Start by filling the pitcher no more than halfway with cool, fresh milk. Try to remove any remaining milk or water from your steam arm so that nothing but fresh steam emerges. Wrap a designated cloth around the steam nozzle to capture any water to prevent expected spilling. To prevent burning your fingertips, take care to keep them away from the nozzle.
- Hold the pitcher straight and level. Place the steam arm at an angle within the pitcher, just off-center but not touching the sides. The nozzle needs to be barely submerged. Don’t be afraid to turn it up really loud. If you don’t apply enough steam pressure, no bubbles will form, and the milk will shriek loudly. Place your left hand at the steam pitcher’s base.
- The milk should be pushed in a circular motion in the direction of the steam pressure. Attempt to slurp for a little bit longer. Foam functions as a sound buffer and dampens noise as it grows. The bubbles become smaller as the noise decreases, resulting in a denser, better foam.
- The air is cut off as the milk expands and rises beyond the nozzle as it warms. Lower the pitcher so that the nozzle stays at the surface if you want lots of foam. To generate a smoother, denser foam, keep the liquid whirling and beat the large bubbles into smaller bubbles.
Now, follow these three steps wisely.
- Only incorporate air while the milk is still colWhenhen you notice that the pitcher’s base has warmed to 37 °C, or body temperature. You should have enough time to produce as much foam as you’d want if you add air as soon as the steam is on.
- Continue swirling the milk until you can’t touch the bottom of the pitcher. Give the procedure five more seconds, then remove your left hand and turn off the steam. If you hear a loud, rumbling sound, the milk is boiling and will taste eggy, which is not what you want in your coffee.
- Place the pitcher to one side. To remove any remaining milk from the inside of the steam wand, wipe it down with a moist cloth and purge for 7 seconds into the cloth. To rupture them, lightly tap the jug against the counter. When the large bubbles cease, stir the milk in the pitcher until it has a glossy, lustrous texture from both the milk and the foam. Swirl once more in a circular motion to finish.
You can avoid using a spoon to remove the foam by swirling the milk to keep the two components combined until the point where you pour it into your cup. With some practice, this will become second nature. You will also be able to create great latte art.
A classic cup of cappuccino
Espresso is typically paired with two types of hot milk that have been steamed and frothed to make cappuccinos. Thirds espresso, thirds steamed milk, and thirds frothed milk make up the traditional recipe.
Buying Guide to Froth and Steam Milk for Making a Perfect Coffee Latte
I still remember the first time a barista handed me a latte with a sheen so glossy it looked like satin. I took one sip and thought, “How does milk do that?” It wasn’t just hot milk with foam on top; it was creamy, velvety, and sweet, with microbubbles so fine the texture felt like warm silk. That’s the difference between heated milk and properly steamed milk. And once you taste it, you can never untaste it. This guide walks you through everything you need to know—from choosing the right gear to understanding milk chemistry, dialing technique, fixing common problems, and picking smart, budget-aware tools that fit your kitchen and your style. Whether you use a classic steam wand, an automatic frother, or a handheld whisk, you’ll learn how to consistently make café-level lattes at home.
What Makes “Latte Milk” Special (and Why It’s Not Just Foam)
Latte milk is a combination of temperature, texture, and sweetness. Most people focus on the froth, but the soul of a latte lives in the microfoam—a silky emulsion of milk and tiny bubbles that creates body without big, airy foam. When done right, steamed milk tastes naturally sweet (no sugar added) because heating highlights lactose sweetness and the proteins stabilize those microbubbles. The ideal result isn’t a cap of froth sitting on a pool of hot milk; it’s one cohesive, glossy texture that pours like wet paint. That texture fuses with the espresso, softening its edges and pulling the flavors into harmony.
If you’ve ever made a latte that tasted flat, scalded, or thin, the culprit was likely either overheating (bitterness and cooked flavors), under-aeration (watery and lifeless), or over-aeration (dry, foamy bubbles that sit on top rather than integrate). This guide will help you find that sweet spot consistently.
The Tools: Steam Wands vs. Frothers vs. All-in-Ones

There are three broad paths to latte milk at home, and each can produce excellent results if you understand its strengths and limitations.
1) Traditional Steam Wand (Espresso Machine)
A proper steam wand injects steam (heat) and entrains air (aeration) while spinning the milk into a whirlpool that polishes bubbles into microfoam. This is the professional way—maximum control and best texture—but it has a learning curve. If you want silky latte art, a steam wand is your best ally. Small machines can still do a beautiful job if the wand is well designed and the boiler or thermoblock delivers steady steam.
Who it’s for: Tinkerers, latte art lovers, and anyone who wants café texture and control.
2) Automatic Milk Frother (Stand-Alone)
Stand-alone electric frothers handle heating and whisking at the push of a button. They take the guesswork out of temperature and foam density with presets—great for convenience and consistency. Some models create decent microfoam suitable for latte art, though most excel at cappuccino foam or flat white/latte textures with less finesse than a skilled steam wand user.
Who it’s for: Convenience seekers, larger households, multitaskers who want hands-off milk while prepping espresso.
3) Handheld Frother (Battery or Rechargeable)
These miniature whisks are surprisingly powerful for the price and footprint. They’re fantastic for quick lattes, flavored milk drinks, iced beverages, or travel setups. You’ll warm the milk separately (stovetop or microwave) and whisk it to a tea texture. You won’t get the same gloss as a pro wand, but you can make a delicious, creamy latte with practice.
Who it’s for: Budget buyers, beginners, and minimalists who want an upgrade over plain hot milk.
Milk Science, Simply Explained
Understanding milk’s behavior is half the battle. Two components matter most: proteins and fats.
- Proteins (mainly whey and casein) stabilize bubbles. When milk heats to the right range, proteins unfold (denature) just enough to trap tiny air pockets and create that velvety microfoam. Too cold and they won’t stabilize; too hot and they break down, leading to big, unstable bubbles or scalded flavors.
- Fats lend richness and mouthfeel. Whole milk’s fat content gives your latte that indulgent body, while lower-fat milk can produce more foam but feel lighter and less creamy.
Temperature Targets
For latte milk, aim for 55–65°C (130–149°F). Many baristas settle around 60–65°C (140–149°F). Below ~55°C, the milk tastes lukewarm and thin. Above ~70°C (158°F), it starts tasting cooked and loses sweetness quickly. If you don’t have a thermometer, train your hand: the pitcher should feel hot but still touchable for a few seconds when you stop steaming. With practice, you’ll hit your favorite target by feel.
Milk Choices and How They Behave
- Whole cow’s milk: The gold standard for latte sweetness and body. Silky, forgiving, and the easiest path to glossy microfoam.
- 2%/semi-skim: Lighter body, often more foam. Still delicious if you prefer a less rich texture.
- Skim: Foams easily, but the texture can feel drier or meringue-like; the flavor is less sweet.
- Barista-style oat milk: The top alternative for latte art and body; look for “barista” formulations. Sweet, creamy, and stable.
- Soy (barista versions): Can create great microfoam; watch heat—some soy curdles if overheated or added to very acidic espresso.
- Almond: Tasty but typically more delicate; choose barista blends for better stability.
- Coconut: Rich flavor but can split; best in flavored drinks rather than classic lattes.
- Lactose-free milk: Often tastes sweeter because lactase breaks lactose into simpler sugars; it can steam nicely with practice.
- Raw milk: Steams differently due to unstandardized fat/protein; not recommended unless you’re experienced and mindful of safety.
If you’re going plant-based, seek “barista” or “professional” versions—they’re formulated to behave like dairy in steaming and foam stability.
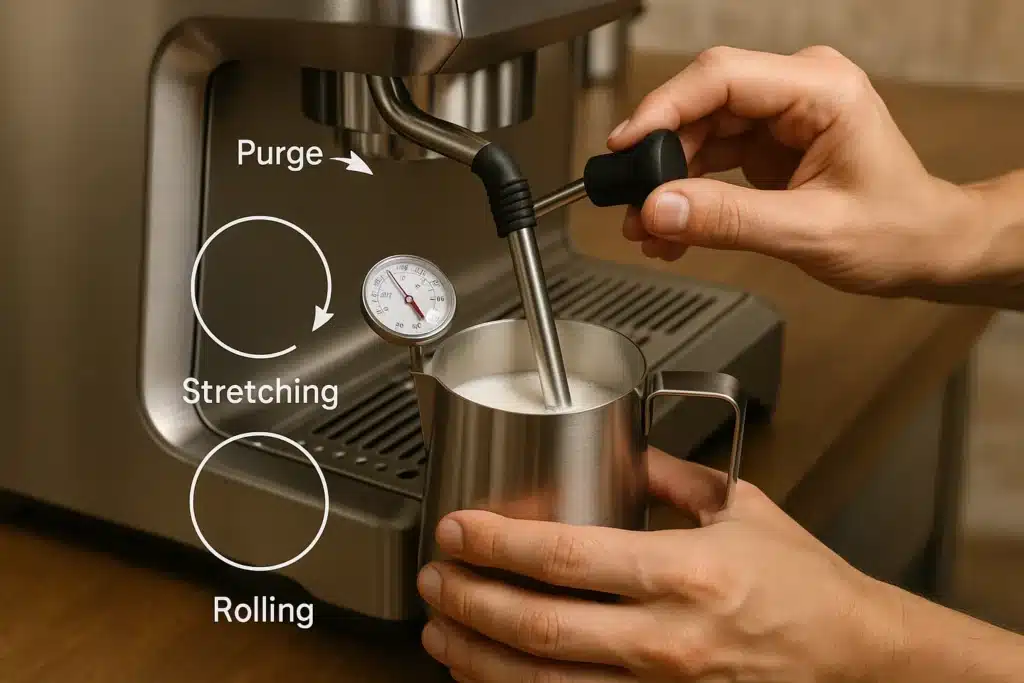
Technique with a Steam Wand: Stretch, Spin, and Stop

If you opt for a steam wand, the dance has two phases: aeration (stretching) and emulsification (texturing).
- Purge the wand to expel condensation. Start with cold milk in a cold, stainless steel pitcher. Fill to just below the spout base—roughly one-third to halfway full—to give space for expansion.
- Stretch (introduce air) for a few seconds at the start. Keep the tip just kissing the milk surface so you hear a soft, steady “psst-psst” whisper, not a loud screech. This adds the tiny bubbles you’ll later polish.
- Drop the tip slightly and angle the pitcher to create a whirlpool. This spinning polishes bubbles into microfoam and distributes heat evenly. The surface should look glossy and unified, not bubbly.
- Stop at the temperature. Aim for 60–65°C (140–149°F). With practice, you’ll learn your machine’s pace and stop a touch early; residual heat rises a few degrees.
- Wipe and purge the wand immediately to keep it hygienic and prevent burnt milk build-up.
- Polish the pitcher: Tap gently on the counter to pop any visible big bubbles, then swirl to keep the texture glossy and cohesive until you pour.
Pouring for a Latte
A proper latte isn’t layered like a cappuccino. Hold your cup with espresso ready. Start with a higher pour to integrate milk and espresso, then bring the pitcher closer as the cup fills to lay microfoam on top. If your texture is right, latte art becomes possible; if not, it will still taste great—art is a bonus, not a requirement.
Technique without a Steam Wand: Frothers that Work
Electric Stand-Alone Frother
Pour cold milk to the marked line, select your program (latte/flat white vs cappuccino foam), and let it run. The internal whisk and heater deliver repeatable results. If you want finer microfoam, experiment with colder starting milk and stop a touch early to avoid overheating. Some units include separate discs for different foam densities; try both and taste the difference.
Handheld Frother
Warm your milk first—stovetop or microwave—to just below your target, then finish with the frother so you don’t overshoot. Keep the whisk head slightly below the surface to pull in a little air, then dip deeper and whirl to refine texture. Short bursts work better than one long blast. Swirl the container as you froth to mimic a whirlpool.
Pitchers, Thermometers, and Little Things That Matter
- Pitcher size: A 12 oz (350 ml) pitcher is perfect for single lattes; a 20 oz (600 ml) pitcher for two drinks. Smaller pitchers give better control when you’re learning.
- Spout shape: A sharper spout helps with latte art, but any decent pitcher will do for taste.
- Thermometer: A clip-on analog or quick digital probe builds muscle memory. You won’t need it forever, but it accelerates learning.
- Milk freshness: Fresher milk tends to foam more predictably. Milk near expiry often loses its snap.
- Water quality: Hard water can affect steam performance and scale your machine quickly. Filtered water keeps steam power consistent and your boiler healthier.
Troubleshooting: Your Most Common Milk Problems (and Fixes)
Big bubbles and dry foam
Likely too much air or a tip that stayed above the surface. Introduce air only briefly at the start, then submerge slightly and whirl. If using a frother, reduce whisking time and keep the head just under the surface before dipping deeper.
Thin, lifeless milk
You didn’t add enough air, or you overheated and collapsed the structure. Stretch a bit longer at the start—two to four seconds of gentle “psst”—then focus on the whirlpool. Keep your temperature under 70°C.
Burnt taste
You steamed too hot. Stop earlier. If the pitcher is screaming hot in your hand, it’s already too late. Use a thermometer until you build intuition.
Foam separates from milk.
Texture wasn’t polished. You created bubbles but didn’t emulsify them. Spend more time with the tip just under the surface, building a strong whirlpool to integrate foam.
Plant milk curdling
Usually, heat or acidity the bath riser-formulated alternatives, steam a bit cooler (55–60°C), and pour sooner. Sometimes pouring technique—starting higher to integrate—helps.
Cleaning and Care (The Unsexy Secret to Great Milk)
Milk residue is enemy number one. It scorches onto wands, clogs holes, and creates off-flavors.
- Wipe and purge after every use. A damp microfiber cloth works wonders.
- Soak tips weekly in a milk system cleaner (follow your machine’s manual). For frothers, disassemble and wash the whisk parts thoroughly.
- Descale your espresso machine as recommended. Scale weakens steam pressure and ruins your texture.
Clean gear isn’t optional; it’s a flavor and performance multiplier.
Budget, Space, and Lifestyle: Choosing the Right Path
Before you buy anything, take a moment to picture your mornings. Are you a “two lattes back-to-back” household? Do you want latte art practice as a hobby, or a one-button solution while you pack lunches? Are you short on counter space? Do you host friends on weekends?
- If you love tinkering and latte art, a compact espresso machine with a capable steam wand will make you happiest.
- If you value speed and autopilot, a reliable automatic frother paired with your espresso or capsule machine is unbeatable for convenience.
- If you need portable and affordable, a handheld frother plus a good pitcher and thermometer gets you 80% of the way for a fraction of the cost.
Selecting a Milk Pitcher and Thermometer That Don’t Fight You
A pitcher that’s too large makes whirlpool control hard. A shape that’s too blunt can frustrate latte art. For most people, a 12-oz stainless pitcher with a defined spout is the sweet spot. As for thermometers, any accurate, fast-reading probe does the job. Use it for a month, then test your intuition weekly by comparing your “by feel” stop with a quick temperature check.
Dialing in for Different Drinks
Latte: The target texture is silky with little to no dry foam. Stretch briefly; polish longer.
Cappuccino: More aeration for thicker foam; keep the temperature moderate so it stays sweet.
Flat white: Like a latte but with even tighter microfoam and slightly lower volume; texture matters more than volume.
Macchiato/Cortado: Very little aeration; prioritize smooth, warm milk that integrates but doesn’t dominate.
Once you know how to steer texture, you’re not stuck with one trick—you can make the whole menu.
Espresso Pairing: Why Milk Texture and Shot Style Should Match
A light, fruit-forward espresso can get lost under heavy foam; a darker, chocolatey espresso can carry thicker milk easily. If you favor modern light roasts, lean into silky, thinner microfoam at slightly cooler temperatures to protect delicate aromatics. If you love classic, chocolate-nutty roasts, a touch more heat and a tad more body in the milk feels cozy and dessert-like.
The Best Selections on Amazon to Nail Latte Milk at Home
Breville Bambino Plus Espresso Machine
Compact, fast, and famous for a surprisingly strong steam performance in a small footprint. The automatic milk settings are convenient, but the manual wand lets you learn real technique. A great starter for latte art ambitions.

Who is this for?
Perfect for espresso lovers craving speed and quality, the Breville Bambino Plus heats in 3 seconds and features automatic milk texturing. Ideal for small kitchens and beginners wanting coffee-shop results without complexity or bulk. It delivers consistent, barista-level coffee in a compact and sleek design.De’Longhi Dedica Arte Espresso Machine (EC885M)
Slim design with a capable steam wand that can produce respectable microfoam once you get the hang of it. Ideal for small kitchens and single-serve latte lovers.

Who is this for?
The De’Longhi Dedica Arte is perfect for espresso lovers who want compact elegance without sacrificing performance. With a professional steam wand, fast heat-up time, and a slim profile, it’s ideal for home baristas in small kitchens. Craft café-quality espresso and lattes with precision and minimal counter space.Breville Milk Café Milk Frother
A stand-alone frother with temperature control and interchangeable frothing discs. It handles everything from latte-style silk to cappuccino foam and hot chocolate nights for the family.

Who is this for?
The Breville Milk Café is perfect for home baristas and latte lovers seeking rich, creamy froth with minimal effort. With adjustable temperature control and induction heating, it prepares hot or cold froth for cappuccinos, lattes, and more. Great for anyone who wants café-quality milk texture without needing an espresso machine.Nespresso Aeroccino 4 Milk Frother
Push-button simplicity with multiple foam settings. It’s the “set it and forget it” solution when you want reliable foam while you pull shots or prep breakfast.

Who is this for?
The Nespresso Aeroccino 4 is perfect for anyone who wants rich, barista-style froth at home. With multiple settings for hot and cold foam, it’s ideal for lattes, cappuccinos, and iced drinks. Sleek, easy to clean, and incredibly quiet, it’s a must-have for both coffee novices and connoisseurs.Zulay Original Milk Frother (Handheld)
A compact, budget-friendly whisk that punches above its weight. Paired with a small pitcher and thermometer, it’s the easiest way to elevate milk texture without committing to a full espresso setup.

Who is this for?
The Zulay Original Milk Frother is perfect for coffee enthusiasts who want café-style foam at home. Compact and powerful, it works on lattes, cappuccinos, matcha, and hot chocolate. Great for busy mornings or relaxing weekends, it’s ideal for those who value convenience, portability, and rich, creamy froth anytime.Practice Drills: Five Minutes a Day
You don’t need a café’s worth of milk to learn. Use 100–150 ml at a time and treat practice like reps at the gym.
- Silent Stretch: Aim for a gentle “psst” for two seconds, then whirl. If you hear a loud paper-tearing screech, you’re too high; lower the tip.
- Gloss Check: Stop steaming, tap to pop big bubbles, and swirl until the surface looks like wet glass. If bubbles return, you didn’t polish enough—try again.
- Temperature Memory: Use a thermometer for a week, then hide it for a day and steam by feel, checking your result afterward. Your hands learn faster than you think.
- Pouring Rhythm: Practice pouring water into the sink from your pitcher at different heights. Smooth wrist and consistent flow make latte art easier later.
- Plant-Milk Day: Pick a barista oat or soy and steam cooler (55–60°C). Notice how tiny shifts in heat change stability.
These drills compound. Two weeks from now, you’ll wonder why it ever felt hard.
Maintenance Habits that Protect Your Investment
Descaling isn’t glamorous, but steam power depends on a clean system. Follow your machine’s guidance for descaling frequency based on water hardness. Always purge after steaming; milk can backflow and gunk up the tip. For stand-alone frothers, remove and rinse whisk components immediately after use—dried milk is stubborn and impacts performance.
Seasonal Tweaks and Household Realities
In summer, kitchens run hotter and milk warms faster—stop steaming a few seconds earlier. In winter, pitchers and cups are colder; pre-warm your cup with hot water so your latte doesn’t lose heat on contact. If multiple people drink lattes in a row, wipe and purge between each round, and give the machine a moment to recover steam pressure, your second latte deserves the same texture as the first.
Tasting Notes: Training Your Palate to Recognize Great Milk
When you sip a latte, ask yourself three questions:
- Is it sweet without sugar? Proper steaming coaxes natural sweetness. If you taste bitterness, suspect overheating.
- Does the texture feel seamless? The goal is unified silk, not layers of foam and liquid.
- Does the espresso still speak? Milk should soften, not smother. If the latte tastes like warm milk with a hint of coffee, tighten your milk texture or strengthen your shot.
Taking notes might feel nerdy, but even one word per latte—“silky,” “flat,” “too hot”—will guide tomorrow’s adjustments.
Common Myths—Gently Debunked
“More foam equals better latte.”
Not necessarily. Lattes should be silky, not fluffy like a cappuccino. It’s about microfoam quality, not foam quantity.
“Skim milk makes the best foam.”
It can make lots of foam, but not always the best texture for lattes. Whole milk is usually more satisfying. For alternatives, barista oat is a star.
“You need an expensive machine.”
Nice gear helps, but technique matters most. Plenty of home baristas pour gorgeous lattes with compact machines or a good electric frother.
“Thermometers are for beginners.”
They’re for pros and beginners. Temperature is flavor. Use tools until your hands learn the language.
Putting It All Together: A Simple Home Routine
Picture a typical morning. Your espresso shot is ready. In your 12-oz stainless pitcher, you’ve poured cold whole milk to just under the spout base. You purge the wand, set the tip at the surface, and listen for that whisper—one breath, two, maybe three. Then you lower the tip slightly, angle the pitcher, and watch the whirlpool. The surface turns glossy. You stop at 60–65°C, wipe and purge, tap and swirl, then pour in a steady stream, starting high to integrate and finishing low to lay the velvety foam like a blanket. You take a sip. Sweetness. Silk. Espresso and milk in harmony. That’s a latte.
The next day, you try barista oat at a slightly cooler stop. The texture holds. A friend comes over on Saturday, and you switch to an automatic frother for two cups at once—same silky result, less dance. You’re not guessing anymore; you’re choosing.
Final Thoughts: Your Latte, Your Way
A perfect latte isn’t a single recipe—it’s a repeatable feeling. The milk is sweet without sugar, warm without scorch, and so silky it seems to glow. You get there by combining the right tool for your lifestyle with a handful of techniques: brief stretch, strong whirl, stop at temperature, clean gear, and small adjustments. Start with what you have, upgrade only where it makes sense, and let taste be your compass. A few mornings from now, you’ll tilt that pitcher and see a glossy mirror staring back. That’s your sign: you’ve learned the language of latte milk—and your kitchen just became your favorite café.


